
get started
Membership Management
Advertising network
Setting up a Registration
Last Update :
Every event is built in the same place: the Event Configuration editor. The editor is split into tabs that cover one piece of the setup each, from basic event details on the first tab to a live preview of the registration form on the last. Almost every field saves automatically as you edit it. You can leave mid-setup and come back whenever; your changes are already in the database.
This article walks through creating a new event from scratch. The same tabs and tools apply when you're editing an existing event — click the edit icon on any event card in the event list to open it in the same editor.
Step 1: Create the event
From the main menu, click Event Registration to open the event list. Click the Add New Event dropdown and pick a starting point:
- Use Gabi to Create an Event. Opens the AI event builder. Describe your event in plain English (or upload a flyer image or PDF) and Gabi drafts the configuration for you to review and approve. See Section: Create with Gabi for the full walkthrough. (Hidden if your organization has opted out of AI features.)
- Start From Template. If your organization has saved templates, this slides open a picker. Templates are stripped-down event configurations meant as reusable starting points.
- From Calendar Event. Opens a small dialog with a list of upcoming entries from your Calendar of Events. Pick one and the new event registration is pre-populated with the calendar entry's name, dates, and basic info.
- Clean Start. Creates a blank event with sensible defaults and drops you straight into the configuration editor.
To clone the configuration of an event you already have, don't use this menu. Click the Copy icon on the existing event's card in the event list instead. That lets you copy the packages, custom fields, advanced options, and verbiage from one event into a new one. Standard choice for annual events.
New events are created with their public visibility set to Available, which means they appear on the event list and accept registrations as soon as they exist. If you'd rather finish your setup before anyone can see the event, change the Registration Available setting on the General Information tab to Disabled. Attendees can't see or register for the event while it's disabled. Switch it back to Available when you're ready to go live.
Step 2: Work through the tabs
The sidebar on the left lists every section of your event. The active tab is highlighted in your organization's brand color. You don't have to work through the tabs in order, but they're arranged in the natural setup flow.
On mobile, the sidebar collapses to a horizontal scrolling strip stuck to the top of the page. The same tab names show, just laid out horizontally.
General Information
This information covers what the event is, when and where it happens, who gets notified about new registrations, and capacity.
- Event Name. What attendees see on the registration form and in confirmation emails.
- Description. Rich-text block that appears under the name on the registration page. Supports basic formatting (bold, lists, links).
- Event Image. Upload an image to brand the registration page, confirmation emails, and public event listings. The Advanced Image Options accordion below the upload lets you set a click-through URL, override the displayed width, position the image centered at the top of the form, or pick from your organization's saved promo images.
- Attendee Limit for Event and Attendees per Transaction Limit. Capacity caps. The first caps total registrations across the event. The second caps how many seats one group can buy in a single checkout. Leave either blank for no limit. Setting an attendee limit also surfaces waitlist options below it.
- Notification Email Address. The address that gets an email every time someone registers. Use a distribution list if multiple staff need to see new registrations.
- Registration Available. Public visibility setting. Options include Available (visible and registerable), Disabled (hidden from the event list, no registration possible), Hidden (registerable via direct link, but hidden from listings), Registration Coming Soon, Registration Temporarily Suspended, Registration Closed, and Registration Full. Use this if you need to keep an event private while you finish setup, put a live event on pause, restrict it to people with the direct link, or close registration after the cutoff.
- Date & Time Settings. Event begin date, end date, the day registration opens (Available On Date), the cutoff date to stop accepting registrations, start and end times, and timezone. Date-aware features across MemberLeap (reminders, "show past events" filters, calendar invites) key off these values.
- Location Information. Venue name, street address, city, state, ZIP. Surfaces on the registration page header, in confirmation emails, and on "Add to Calendar" ICS files. For virtual events, leave most of this blank or use it for a join-link line.
If you've previously favorited any settings on the Advanced Options tab, those settings appear in a Favorites block at the top of this tab. See Section: Configuration for how to favorite settings.
Click Save and Continue at the bottom to commit any pending changes and advance to the next tab. Most fields autosave the moment you finish editing them.
Event Packages
Packages are the pricing tiers attendees pick at registration. Every event needs at least one package, even if it's free (set the cost to 0).
Use Add Package to open the package editor in a slide-out panel. Use Copy Packages from Another Event to clone the packages from a different event into this one. Existing packages render as cards. Drag the handle on the left to reorder; that order is what attendees see on the registration form. Each card has Edit, Copy, and Delete action icons on the right.
See Section: Packages for full details on package configuration, including member-only restrictions, certifications, table packages, GL routing, confirmation verbiage, and capacity rules.
Custom Fields
Custom fields are the extra questions you ask each attendee at registration. Anything beyond standard contact info: dietary restrictions, t-shirt size, session picks, board position interest, transportation needs.
The collapsible Hide/Show/Require Core Attendee Fields section at the top of the tab controls which standard contact-info fields (first name, last name, address, phone, etc.) appear on the registration form and whether each is optional or required. Use this to trim the form: if you don't need a mailing address, hide it; if you require phone number, require it. Changes here save automatically.
Below that is the list of custom fields you've added. Each row is one field. The handle on the left reorders; that order is what attendees see on the form. Action icons on the right are Edit, Copy, Delete, and (for selection-type fields) Options.
Adding a new field opens a small panel that asks for the field type first. Available types are Text Field (single-line text), Selection (drop-down or radio buttons), Checkbox, Multiline Text, Numeric, Open Donation (when your event doesn't use tax rates), and Text Caption (a static heading or instructions block that collects no input). After you pick a type, you get the full field editor. See Section: Custom Fields for the walkthrough of each field type.
Advanced Options
Every fine-grained setting that doesn't fit on the other tabs lives here. Settings are organized into expandable section cards: Common Options, Emails & Notifications, Miscellaneous Options, Access Restrictions, Cross-Reference & Prospects, and Invoice and Payment Options. Some sections only appear if your organization has the related feature enabled.
Most settings are checkboxes or short text fields, and almost everything autosaves the moment you change it. The search box at the top filters across all sections in real time; type any setting name and irrelevant cards collapse out of view.
Next to every setting is a small heart icon, click it to favorite that setting. Favorited settings are surfaced in a quick-edit block at the top of the General Information tab.
See Section: Configuration for an overview of the most commonly-used options.
Verbiage & Labels
Override the standard text MemberLeap shows on the registration form, in confirmation emails, on invoices, and on badges. Two sections.
- Verbiage Options. Longer-form messages: confirmation messaging, payment instructions, agreement and waiver text, email subject and body. Accepts rich text.
- Alternate Labels. Single-line label overrides for standard form fields. "Given Name" instead of "First Name," "Promo Code" instead of "Discount Code." Use these to match your organization's vocabulary.
Leave any field blank to fall back to the MemberLeap default. Overrides only apply to this event.
Preview & Finish
The last tab does three things.
- Tells you the event setup is complete and gives you a launchpad of tools for the running event: Manage Attendees, Reporting Dashboard, Messages, Reminders, Surveys, Check-in. If the event would make a good starting point for future events, you'll also see a Turn into Template action here. It also links directly to the Event Hub, which is your central landing place for tools to manage the event.
- Lets you preview the registration form through different attendee lenses. Members may see member-only packages, Guests see the public version, Admins see restricted fields and admin-only packages. Pick the lens and the preview below reloads with that role applied.
- Shows a live render of the main registration form. This is exactly what attendees see during registration. Scroll to verify packages, custom fields, dates, and pricing all show the way you expect.
Anytime you change a setting on another tab, come back here to confirm the result without leaving the admin.
Step 3: After the event is set up
From this point on, your home base for the event is the Event Hub. Click the Event Hub link on the event's card in the event list to open it. The Hub gives you at-a-glance stats (registrations, attendees, checked in, revenue), the public registration link with a one-click Copy Link button, and shortcuts to every tool you'll use while the event runs: attendees, messages, reminders, surveys, reports, check-in, the booth map, and the itinerary editor.
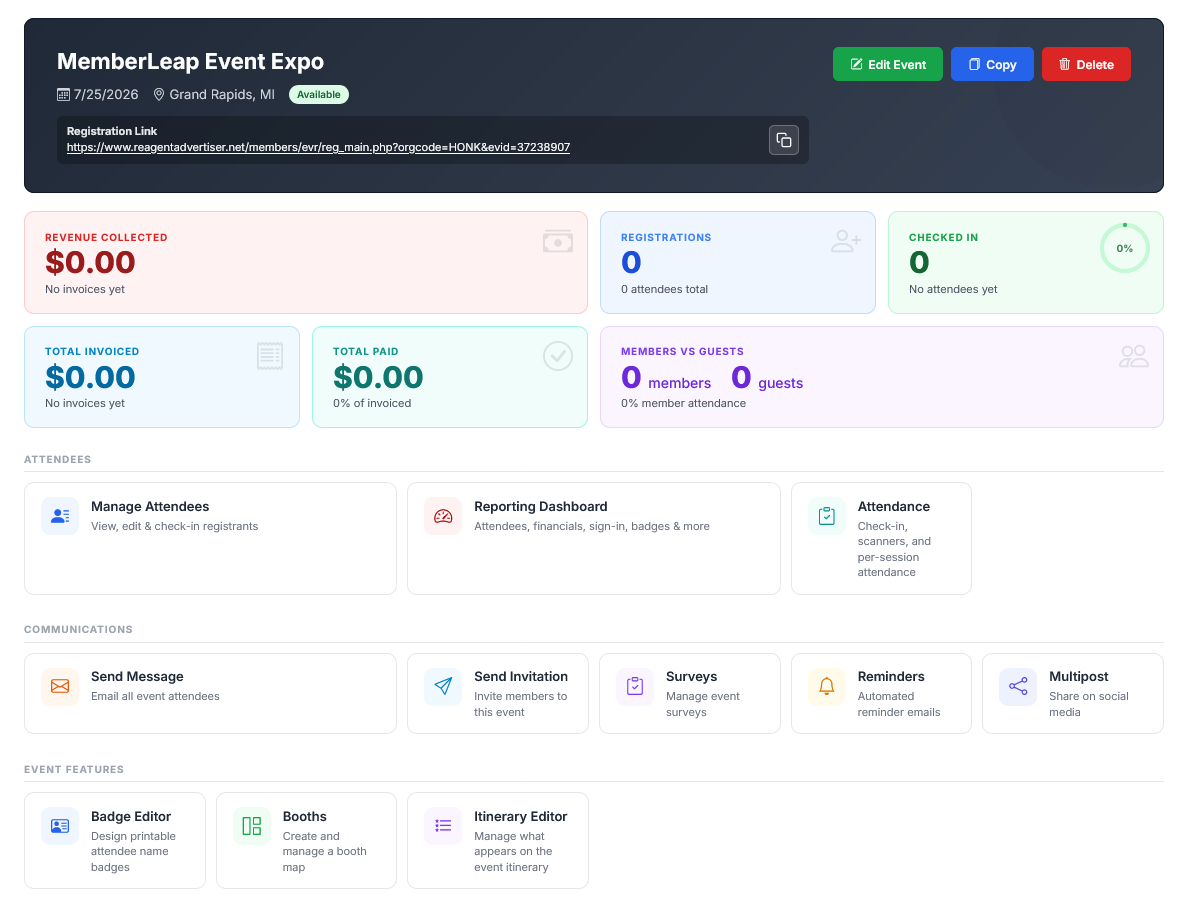
Come back into the configuration editor anytime by clicking the edit icon on the event's card in the event list, or by clicking
Edit Event from the Event Hub. The same tabs are still there. You can adjust settings even while people are actively registering.
A note on autosave
Most fields save automatically the moment you finish editing them. A small status indicator appears briefly to confirm. The
Save and Continue button at the bottom of each tab is mostly a convenience that commits any pending changes and advances you to the next tab. To verify a change saved, refresh the page; if the field still has your value, it persisted.
Tip: Take the in-app tour
The configuration editor has a built-in guided tour. Click the play icon labeled "Take a Tour" in the breadcrumb bar at the top of the page. The tour adapts to whichever tab you're on, so you can launch it on Advanced Options to see explanations of the most-tweaked settings, or on Event Packages to see the package-card workflow. Press Esc to exit.