
New Title
Most settings here are checkboxes or short text fields, and almost everything autosaves the moment you change it — you'll see a small "Saving..." pill in the bottom-right confirm. The search box at the top filters across all section cards in real time; type any setting name and irrelevant cards collapse out of view.
What's in each section
- Common Options. The settings most events touch — use discount codes, allow attendees to return and edit, force descriptions to show, enable file uploads, and other broadly-used toggles.
- Emails & Notifications. Confirmation email behavior (who gets it, what it says), admin alerts when new registrations come in, from-address overrides.
- Projects & Communities. Auto-link registrants to Communities or Projects based on the packages or fields they pick.
- Miscellaneous Options. A grab-bag of behavior toggles — preview mode, registration groups, sign-in agreements, certificate awards, and more.
- Access Restrictions. Lock the form down by membership status — Members Only Registration, Make Event Invitation Only, restrict to specific member types, board members only.
- Cross-Reference & Prospects. How registrations flow back into Member or Prospect records — matching, merging, and follow-up automation.
- Invoice and Payment Options. Payment methods accepted, partial-payment behavior, late fees, pay-by-check details, accounting overrides.
Favorites
Next to every setting on the Advanced Options tab is a small heart icon. Click it to favorite that setting. Favorited settings get pinned to a Favorites block at the top of the General Information tab on every event, so the handful you tweak most are always one click away instead of buried in Advanced Options.
The recommended workflow:
- Use Advanced Options for the initial event setup — visit every section card, configure the settings that matter for the event.
- Favorite the handful of settings you find yourself changing most often (e.g. the registration cutoff date, the confirmation email subject, capacity warnings).
- For subsequent edits, work from the Favorites block on the General Information tab without opening Advanced Options at all.
Favorites are saved per-organization and apply to every event your organization runs. Each user manages their own list independently.
Organization-wide configuration
The global Event Registration configuration page lives at Configuration > Event Registration in the main MemberLeap menu (the exact menu path depends on your organization's permission structure). Settings here apply across every event in your organization and act as defaults for new events you create.
You can also reach the global config from the breadcrumb action bar on most event-registration pages by clicking the Config icon (gear).
get started
Membership Management
Advertising network
Event Registration Attendance Tracking
Last Update : August 2026
For events with multiple sessions, workshops, breakouts, or other distinct things people can attend within the larger event, MemberLeap can track attendance per session rather than just at the overall event level. Each custom field representing a session can have attendance tracking enabled, and then your admin team can mark which attendees actually showed up for which session — whether at the door manually, through a scanner, or in bulk after the fact.
Session-level attendance powers continuing-education credit calculations, multi-day badge printing, CEU reporting, and any compliance use case where "they registered" isn't enough — you need to know they were actually in the room.
Two levels of attendance
MemberLeap supports two kinds of attendance tracking, both available on the same Attendance Hub:
- Event-level check-in. Did the person show up to the event at all? One checkbox per attendee. This is the simpler workflow you'll use for most events. The checkboxes also appear on the regular Attendees page.
- Session-level (by-field) attendance. Did the person attend a specific session inside the event? One checkbox per attendee per session. This article focuses on this second level.
The two work independently — an attendee can be checked in at the door (event-level) but not yet marked as attending any of the individual sessions until each session begins.
Enabling session-level tracking
Session-level attendance is opt-in per custom field, and the feature itself needs to be enabled at the organization level first.
Organization-wide: The Field Attendance Tracking feature must be enabled for your organization. If it isn't, the Attendance Tracking option won't appear on individual custom fields. Contact MemberLeap support if you need this feature turned on.
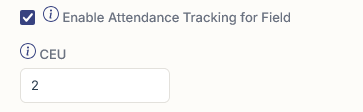
Per custom field: Open the configuration editor, go to the Custom Fields tab, and edit any field that represents a session. In the Field Basics section, check the Enable Attendance Tracking for Field option. Two related controls appear below it:
- Minimum Duration (in minutes) Between Check In and Check Out to Award Credits — when set, the system only counts an attendee as having attended if their check-in and check-out span at least this many minutes. Used for "no partial credit for walking through" rules. Leave blank or 0 to ignore.
- CEU credit amounts. When your organization has the CEU feature enabled, you can configure how many continuing-education credits are awarded for attending this specific session. The field can carry credits for one or more credit types (e.g. 1.5 ethics CEUs, 2.0 general CEUs).
Repeat for every session-type field that should be individually tracked. Sessions you don't enable tracking on still appear as registration choices but aren't tracked at the attendance level.
The Attendance Hub
From the event list, click the Event Hub link on an event's card, then click Attendance Tools from the Event Features section of the hub. The Attendance Hub opens with stats and the tools you need to record attendance.
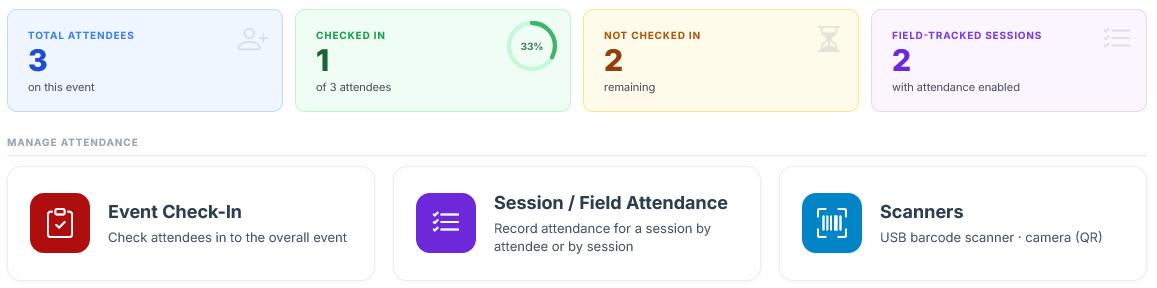
The stats tiles at the top show the live state of attendance for the event:
- Total Attendees on the event.
- Checked In — how many have been marked as having attended the overall event, with a percentage donut.
- Not Checked In — how many haven't been checked in yet.
- Field-Tracked Sessions — how many custom fields on the event have attendance tracking enabled.
Below the stats, the Manage Attendance section has three primary cards.
Event Check-In
The simpler workflow. Opens a slide-out panel listing every attendee on the event with a checkbox for the overall event-level check-in. Click the checkbox to mark them as attended; click again to unmark. Saves automatically.
Use this when you only need to know who showed up to the event in general — no per-session tracking required.
Session / Field Attendance
The session-level workflow. Only appears when at least one custom field on the event has attendance tracking enabled. Opens a picker with two views.
- By Attendee. Pick an attendee from a search-driven list and see every session they're registered for. Check off the ones they actually attended. Use this when you're processing one person at a time — e.g. someone walks up to the registration desk and you mark off which sessions they made it to.
- By Field. Pick a session from the list and see every attendee registered for it. Check off the ones who showed up. Use this when you're processing a whole session at once — e.g. you have the room's signup sheet and want to bulk-mark everyone present.
Both views save automatically as you check or uncheck boxes. You can switch between them at any time.
Advanced Attendance Tracking with Scanners (Platinum Plan feature needs to be enabled to use)
For events with barcoded or QR-coded badges, the scanner workflows let you scan attendees in at the door instead of looking them up manually. Two options:
- USB Scanner. Plug a USB barcode scanner into your laptop, pick the session you're scanning attendees into, and start scanning badges. Each scan checks the attendee in to that session. The page shows a running log of recent scans.
- Camera Scanner. Use the camera on a phone or tablet to scan QR codes. Same workflow as USB — pick the session, then start scanning. Useful for tablets at session entrances or for staff walking the floor. Only available when your organization has the camera-scanner feature enabled.
For both scanners, attendees can be scanned for the overall event (event-level check-in) or for a specific session (session-level attendance) depending on what you've picked.
Bulk-marking sessions
If you have an entire session's worth of attendees to mark at once — for example, you have a paper signup sheet from a workshop — the By Field view above is the fastest UI for that. Pick the session, then check the box next to every name that signed in. The system marks them all and recalculates CEU credits in one operation.
CEU credit awards
When session-level tracking is enabled and a field has CEU credits configured, MemberLeap automatically awards the credits to each attendee marked as attending. Credits flow to the attendee's member record (when they're matched to one) and show up in CEU reports and on member transcripts.
If you've set a Minimum Duration on the field, an attendee must have both a check-in and a check-out recorded, with at least that many minutes between them, for the credits to award. Otherwise the credit calculation skips them.
You can also override credits per attendee through the credit edit modal — useful for partial credits, audit corrections, or one-off accommodations.
Reporting on session attendance
The Reporting Dashboard has several reports that surface session-level attendance:
- Field Data Grid (Fields & Packages tab). Shows a calendar-style grid of all sessions, with attendance percentages per session.
- Field Attendance CSV (Data Exports tab). Consolidated CSV of every attendee's attendance across every tracked session.
- Field/Attendee Report. Reports fields with attendees and their attendance status.
- Attendee Summary PDF. Each attendee's individual summary includes their attendance status for every session they registered for.
Cross-event tracking is also available from the All-Event Reporting Dashboard, where reports like the consolidated transcript and attendance reports work across every event in your organization.
Tips and patterns
- Enable tracking before the event, not after. Flipping the Enable Attendance Tracking option on a field after the event is over is technically possible, but the tracking only catches attendance recorded going forward. Turn it on during event setup, while you still have time to test the flow.
- By-Attendee vs By-Field is a workflow choice. Use By-Attendee when people approach one at a time. Use By-Field when you have a whole room's worth of names to enter at once. They're recording the same data — pick whichever interface fits the moment.
- Combine with scanners for fast door check-in. Walk-up events with a lot of attendees move fastest with a USB barcode scanner pointed at a printed badge. Pick the session in the scanner workflow, then have attendees scan as they enter the room.
- CEU credits award automatically. Don't manually grant CEUs on the member record — let the attendance system do it. That keeps your CEU records aligned with the underlying attendance data and survives event-by-event audits cleanly.