
New Title
Most settings here are checkboxes or short text fields, and almost everything autosaves the moment you change it — you'll see a small "Saving..." pill in the bottom-right confirm. The search box at the top filters across all section cards in real time; type any setting name and irrelevant cards collapse out of view.
What's in each section
- Common Options. The settings most events touch — use discount codes, allow attendees to return and edit, force descriptions to show, enable file uploads, and other broadly-used toggles.
- Emails & Notifications. Confirmation email behavior (who gets it, what it says), admin alerts when new registrations come in, from-address overrides.
- Projects & Communities. Auto-link registrants to Communities or Projects based on the packages or fields they pick.
- Miscellaneous Options. A grab-bag of behavior toggles — preview mode, registration groups, sign-in agreements, certificate awards, and more.
- Access Restrictions. Lock the form down by membership status — Members Only Registration, Make Event Invitation Only, restrict to specific member types, board members only.
- Cross-Reference & Prospects. How registrations flow back into Member or Prospect records — matching, merging, and follow-up automation.
- Invoice and Payment Options. Payment methods accepted, partial-payment behavior, late fees, pay-by-check details, accounting overrides.
Favorites
Next to every setting on the Advanced Options tab is a small heart icon. Click it to favorite that setting. Favorited settings get pinned to a Favorites block at the top of the General Information tab on every event, so the handful you tweak most are always one click away instead of buried in Advanced Options.
The recommended workflow:
- Use Advanced Options for the initial event setup — visit every section card, configure the settings that matter for the event.
- Favorite the handful of settings you find yourself changing most often (e.g. the registration cutoff date, the confirmation email subject, capacity warnings).
- For subsequent edits, work from the Favorites block on the General Information tab without opening Advanced Options at all.
Favorites are saved per-organization and apply to every event your organization runs. Each user manages their own list independently.
Organization-wide configuration
The global Event Registration configuration page lives at Configuration > Event Registration in the main MemberLeap menu (the exact menu path depends on your organization's permission structure). Settings here apply across every event in your organization and act as defaults for new events you create.
You can also reach the global config from the breadcrumb action bar on most event-registration pages by clicking the Config icon (gear).
get started
Membership Management
Advertising network
Creating an Event with Gabi
Last Update : August 2026
Gabi is the AI-powered event builder built into MemberLeap. Instead of stepping through the configuration editor and filling in every field by hand, you describe the event in plain English and Gabi builds the configuration for you. Date, location, packages, custom fields, capacity limits, payment settings — Gabi makes a best guess at all of it based on what you describe, then shows you the plan before anything is committed.
This is the fastest way to create an event when you know what you want but don't want to spend twenty minutes clicking through the editor. The output is a regular event that you can then refine in the full editor — nothing Gabi creates is locked or different in any way from a hand-built event.
You don't have to start with a blank chat either. Gabi can be seeded from a
pre-set system template (golf outing, conference, luncheon, training class, and similar common shapes), from one of your
org's own user-created templates (a past event you've saved as a template for re-use), or from an
image, flyer, or PDF you upload. Drop in a save-the-date or event flyer and Gabi reads the date, location, schedule, and pricing directly off it. You can mix any of these starting points with chat — upload a flyer, pick a template, and still describe extra tweaks in the conversation.
Getting started
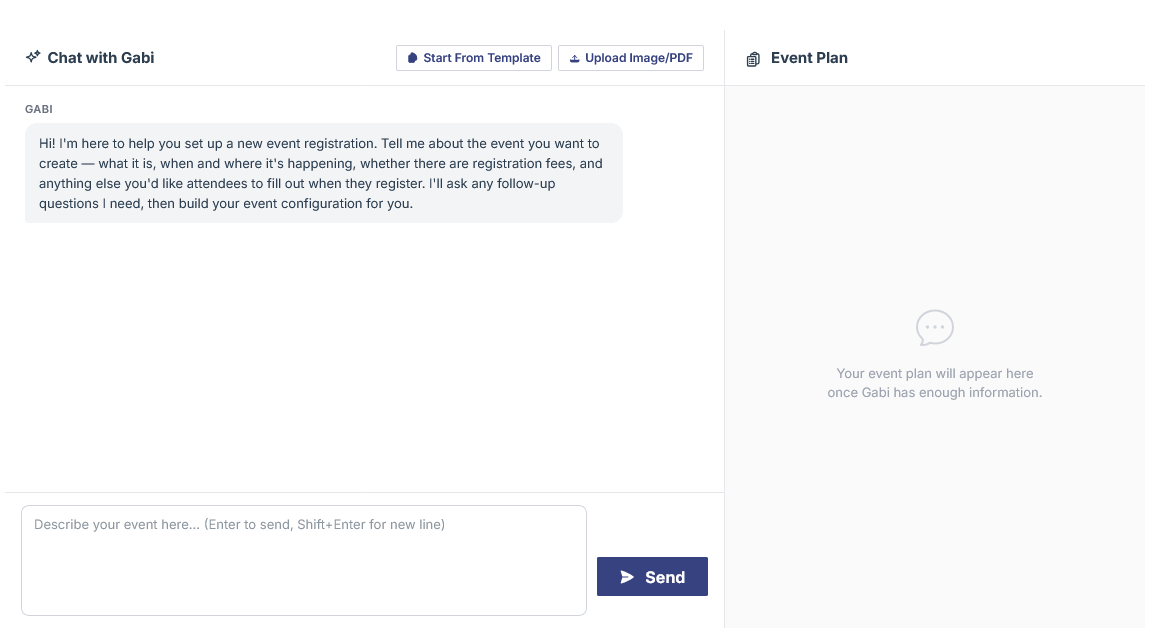
From the Event List, click Add New Event and choose Use Gabi to Create an Event. This opens the Gabi workspace, which has two panels side by side:
- Left panel — Chat with Gabi. A conversation interface. You describe the event, Gabi responds, and you go back and forth until Gabi has enough to build a plan.
- Right panel — Event Plan. Empty at first. Once Gabi has enough information, it generates a structured plan here showing every setting it intends to apply.
Gabi opens with a greeting and a prompt to describe your event — what it is, when and where it's happening, whether there are registration fees, and what info you need to collect from attendees.
Describing the event
Type your description into the input box at the bottom of the chat panel and hit Send (Enter sends, Shift+Enter adds a new line). The more detail you give, the better the plan. A good first message is a couple of sentences covering:
- What the event is (annual conference, golf tournament, member luncheon, training class)
- When it's happening (date or date range)
- Where it's happening (venue name, city/state)
- Whether there are different ticket types or pricing tiers
- What you need to collect from attendees beyond the basics (meal choices, session selections, t-shirt sizes, dietary restrictions)
If you don't cover something Gabi needs, it'll ask follow-up questions in the chat. You can answer as briefly as "$50 for members, $75 for non-members" and Gabi will build that into the package configuration.
Starting from a template or flyer
The chat header has two buttons that give Gabi a head start:
- Start From Template — opens a panel of system templates and your org's user-created templates. Pick one and Gabi seeds the conversation with a description matching that template style. Useful when you know the rough shape (e.g. "golf outing") and want Gabi to fill in details rather than building from scratch.
- Upload Image/PDF — opens a drag-and-drop modal where you can attach a flyer image or PDF (up to 3 files, 5MB each). Gabi will actually read the flyer and pull the date, location, schedule, pricing, and registration details directly off it. This is the fastest path of all when the event is already designed on paper.
You can combine both with a chat conversation — upload a flyer, then add a note like "ignore the early bird pricing, we're not doing it this year" and Gabi will respect that.
The event plan
Once Gabi has enough information, the right panel populates with the event plan. The plan shows every major setting that will be applied:
- Event name and description
- Start and end dates
- Location (venue name, address, city, state)
- Capacity / attendee limit
- Packages (the registration tiers and their prices)
- Custom fields (with their types and any restrictions)
- Field groups, if any
- Payment settings
- Other configuration flags that Gabi has inferred
Read through the plan carefully before creating the event. If something is wrong or missing, just tell Gabi in the chat — "change the price to $65," "add a vegetarian meal option," "make the dietary restrictions field required" — and Gabi will update the plan. The Refresh Plan button at the top of the panel asks Gabi to regenerate the plan from scratch if conversation drifted.
Creating the event
When the plan looks right, click Create Event at the bottom of the plan panel. Gabi builds the event in the database, complete with all packages, fields, and configuration. You're then taken to the full event editor (Section: Setting Up a Registration) where you can:
- Add an event image
- Fine-tune anything Gabi got wrong
- Add restricted admin-only fields
- Configure messages, reminders, and other features
- Test the registration flow
By default the event is created as active and available for registration. If you need more setup time, change the availability state to Disabled on the General tab until you're ready to launch.
Resume a session
If you start a Gabi session and walk away without creating the event, Gabi remembers. The next time you open Gabi within a few hours, you'll see a Resume / Start Fresh prompt. Resume picks up the chat where you left off. Start Fresh closes that abandoned session and gives you a clean slate.
What Gabi can and can't do
Gabi handles the bulk of event setup — the kinds of things you'd otherwise configure on the General, Packages, Custom Fields, and Field Groups tabs. It's good at:
- Inferring sensible package prices and tiers from a fee description
- Building custom fields with appropriate types and options
- Setting up restricted member vs non-member pricing
- Configuring attendee limits and waitlists
- Reading flyers and extracting structured event data
It does not currently handle:
- Designing badges or sign-in sheets (use the dedicated builders — see Section: Badge Builder and Section: Sign-In Sheet Builder)
- Building the booth floor plan (use the Booth Editor — see Section: Booth Editor)
- Setting up surveys, reminders, or scheduled messages
All of those remain manual configuration steps after Gabi creates the base event.
Availability
Gabi has to be enabled for your organization. Most orgs have it on by default; orgs that have opted out of AI features won't see the Gabi entry on the Add New Event dropdown or in the navigation. A full administrator can enable Gabi from the AI features settings if it has been turned off.
Tips and patterns
- Start broad, refine in chat. Give Gabi a paragraph describing the event, then iterate. Don't try to write the perfect prompt the first time — the conversation is the point.
- Upload the flyer. If the event has already been designed (flyer, save-the-date, or website description), uploading it saves an enormous amount of typing. Gabi reads the visual content directly.
- Always review the plan. Gabi is good but not perfect. Read the plan panel carefully before clicking Create Event — especially prices, dates, and field requirements.
- Set to Disabled if not ready. The event is created as Available by default. If you need more time to finish setup before publishing, flip it to Disabled in the editor before sharing the registration link.
- Use templates for repeat event types. If you run the same kind of event multiple times a year, save one as a template and start Gabi from that template each time. You'll get consistent structure with minimal typing.
- Gabi History is available for superusers. If you ever need to see exactly what conversation produced a particular event, the Event Hub for that event shows a Gabi History tool (superuser only) that opens the full transcript.