
New Title
Most settings here are checkboxes or short text fields, and almost everything autosaves the moment you change it — you'll see a small "Saving..." pill in the bottom-right confirm. The search box at the top filters across all section cards in real time; type any setting name and irrelevant cards collapse out of view.
What's in each section
- Common Options. The settings most events touch — use discount codes, allow attendees to return and edit, force descriptions to show, enable file uploads, and other broadly-used toggles.
- Emails & Notifications. Confirmation email behavior (who gets it, what it says), admin alerts when new registrations come in, from-address overrides.
- Projects & Communities. Auto-link registrants to Communities or Projects based on the packages or fields they pick.
- Miscellaneous Options. A grab-bag of behavior toggles — preview mode, registration groups, sign-in agreements, certificate awards, and more.
- Access Restrictions. Lock the form down by membership status — Members Only Registration, Make Event Invitation Only, restrict to specific member types, board members only.
- Cross-Reference & Prospects. How registrations flow back into Member or Prospect records — matching, merging, and follow-up automation.
- Invoice and Payment Options. Payment methods accepted, partial-payment behavior, late fees, pay-by-check details, accounting overrides.
Favorites
Next to every setting on the Advanced Options tab is a small heart icon. Click it to favorite that setting. Favorited settings get pinned to a Favorites block at the top of the General Information tab on every event, so the handful you tweak most are always one click away instead of buried in Advanced Options.
The recommended workflow:
- Use Advanced Options for the initial event setup — visit every section card, configure the settings that matter for the event.
- Favorite the handful of settings you find yourself changing most often (e.g. the registration cutoff date, the confirmation email subject, capacity warnings).
- For subsequent edits, work from the Favorites block on the General Information tab without opening Advanced Options at all.
Favorites are saved per-organization and apply to every event your organization runs. Each user manages their own list independently.
Organization-wide configuration
The global Event Registration configuration page lives at Configuration > Event Registration in the main MemberLeap menu (the exact menu path depends on your organization's permission structure). Settings here apply across every event in your organization and act as defaults for new events you create.
You can also reach the global config from the breadcrumb action bar on most event-registration pages by clicking the Config icon (gear).
get started
Membership Management
Advertising network
Itinerary Builder
Last Update : August 2026
The Itinerary Builder is where you turn your event's custom fields (and the sessions, workshops, or other scheduled blocks they represent) into a published agenda. That agenda can appear in up to three places — a public schedule linked from the event landing page, a general schedule inside the Attendee Portal, and a personalized schedule in the portal that shows each attendee only the sessions they signed up for. You control the event-page link here in the builder; the two portal views are turned on as tiles in the Portal Builder.
Use the Itinerary Builder for any event with multiple sessions, breakouts, workshops, or named time blocks where attendees benefit from seeing a clear "what's happening when" view.
Getting to the Itinerary Builder
From the event list, click the Event Hub link on an event's card, then click
Itinerary Editor from the Event Features section of the hub.
How the builder is laid out
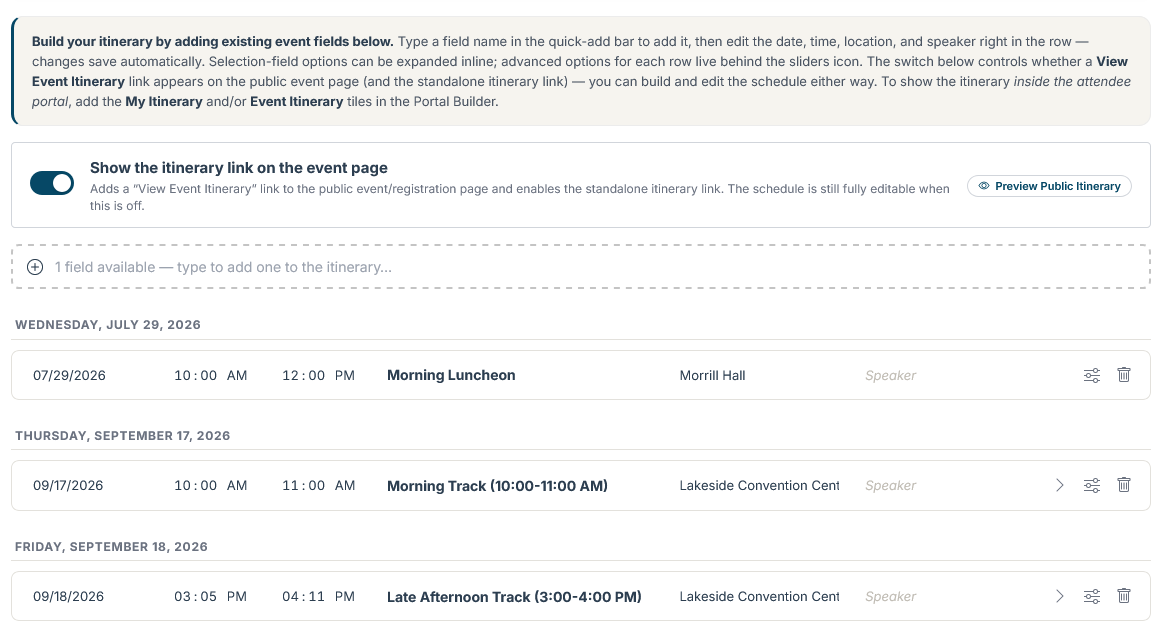
The page has four main sections, top to bottom:
- The title row with a quick instructions block on the left and a Preview Public Itinerary button on the right.
- The “Show the itinerary link on the event page” switch, which controls the public event-page link.
- The quick-add input, where you type a field name to add it to the itinerary.
- The entry list, grouped by date, where every itinerary entry is inline-editable.
How itinerary entries work
The itinerary doesn't store its own entries separately — instead, it pulls from the custom fields you've already created on the event. A field becomes an itinerary entry when you add it through the builder. The field's existing data (name, location, date, time, speaker, etc.) flows straight into the itinerary.
This means there's only one source of truth for sessions: the custom field. If you change a session's time in the itinerary, that change saves back to the field. If you update the field directly through the Custom Fields tab, the itinerary picks up the update. They're the same record viewed two different ways.
Where the itinerary appears
The itinerary can show in three places, controlled in two spots:
- On the public event landing page. Controlled here in the builder by the Show the itinerary link on the event page switch (below the instructions, next to the Preview Public Itinerary button). When it's on, a View Event Itinerary link appears on the event's public landing page — no login required. Leave it off while you're still building; the schedule stays editable either way.
- In the Attendee Portal — general schedule. Turned on by adding the Event Itinerary tile in the Portal Builder (Section: Event Attendee Portal). Shows the full agenda to logged-in attendees.
- In the Attendee Portal — personalized schedule. Turned on by adding the My Itinerary tile in the Portal Builder. Shows each attendee only the sessions they registered for — ideal for multi-track events where attendees shouldn't have to scan the whole menu after registering.
The three surfaces are independent: put the schedule on the event page, in the portal, in both, or (while you build) neither. The builder owns the event-page link; the Portal Builder owns the two portal tiles. The switch saves automatically.
Individual entries can also be set to show on the general schedule, the personalized schedule, or both, through each row's advanced options (see below) — handy when one session should appear only on the personalized view.
Adding entries to the itinerary
The quick-add input below the event-page switch is an autosuggesting search box that lists every custom field on your event that's not already in the itinerary. The placeholder text shows how many fields are available.
Type any part of a field name and a popup shows matching results. Click one to add it to the itinerary. The new entry appears at the bottom of the list (or under the appropriate date group, if the field already had a date).
Custom-field types supported as itinerary entries: any field that represents a session — typically Text, Selection, Checkbox, or Numeric fields with a date and time set. Text Caption fields aren't included since they don't represent attendance choices.
Editing an entry
Every cell in the entry row is editable in place. No "Edit" button to click, no slide-out panel to wait for — click any field on the row and start typing..

The cells you can edit directly:
- Date. The date this entry happens. Use the mm/dd/yyyy format. Changing the date moves the entry into the appropriate date group automatically.
- Start Time and End Time. When the entry runs. Native time pickers.
- Location. Where the entry happens — room name, virtual link, venue address.
- Field Name. The session or activity name. This is the same value as the custom field's name, so changes here update the field.
- Speaker. The person presenting or leading the entry.
Each change saves automatically when you finish editing the cell (leave focus or press Tab). You'll see a brief save indicator. No explicit save button.
When you change a date or time, the entry reorders itself into its new position in the schedule automatically.
Row actions
On the right side of each row are action icons:
- Expand caret (for selection-type fields only). Reveals the field's options as child entries underneath the parent, so each individual selection option can have its own date, time, and location separate from the parent field. Useful for "Breakout Session" fields where the parent is a category and the options are the actual sessions.
- Sliders icon (advanced options). Opens a small panel below the row with a per-entry visibility setting (General / Personal / Both — which portal schedule this entry shows on), an Edit Speaker Bio button (opens a rich-text bio editor in a focused modal), and a primary-toggle option for showing the entry as a single block vs. its children.
- Trash icon. Removes the entry from the itinerary. The underlying custom field stays on the event — only the itinerary appearance is removed. You can re-add the field anytime through the quick-add bar.
Editing a speaker bio
The Edit Speaker Bio button (inside the row's advanced options) opens a focused modal that shows just the rich-text bio editor for that entry's speaker. Use this for full speaker bios with formatting, links, photos, and so on. The bio shows up on the public itinerary's detail page when an attendee clicks into the session.
The focused modal is a quality-of-life shortcut — the same speaker bio field exists on the full Custom Field editor, but the itinerary modal is faster when you're working through bios session-by-session.
Previewing the public itinerary
The Preview Public Itinerary button at the top right of the page opens the public itinerary view in a new tab. This is exactly what attendees see when they visit the event's public landing page (when the “Show the itinerary link on the event page” switch is on). The preview works even while the switch is off, so you can check your work before publishing.
Use the preview to verify the agenda looks right after edits. Each session appears with its date, time, location, speaker, and clickable detail link. Click a session to see the full bio, description, and any extra metadata.
The personalized version
When you add the My Itinerary tile in the Portal Builder, the itinerary also appears inside the Attendee Portal for each attendee. The personalized view shows only the sessions that attendee selected during registration — not the full event schedule. (Add the Event Itinerary tile instead, or as well, to show the full agenda in the portal.)
This is the killer feature for multi-track events. A conference with 50 breakout sessions becomes a 6-session schedule for each attendee — their conference, not the whole conference. See Section: Event Attendee Portal for how to set up the portal tiles.
Tips and patterns
- Build the custom fields first, then the itinerary. Since the itinerary pulls from your custom fields, set up your sessions on the Custom Fields tab with rough placeholder dates and times, then come to the itinerary to polish the schedule. Trying to build both at the same time is harder than doing one then the other.
- Use the per-attendee view as a customer benefit. Attendees love seeing only their own sessions instead of scanning the whole agenda. Adding the My Itinerary tile in the Portal Builder (alongside or instead of the public event-page link) costs nothing and dramatically improves the attendee experience on event day.
- Date format matters. Always enter dates in mm/dd/yyyy format. Sessions with no date are grouped under "Unscheduled" at the top of the list — that's the visual nudge that tells you to set a date.
- Use Off during setup. While you're building the agenda, set visibility to Off so attendees don't see a half-finished schedule. Flip it to Public or Both when you're ready.
- Selection field options can each have their own time. For a "Breakout Session" selection field with three options, expand the parent and set the date, time, and location on each option individually. Attendees see them as distinct sessions on the itinerary, even though they're all under one field on the registration form.