
New Title
Most settings here are checkboxes or short text fields, and almost everything autosaves the moment you change it — you'll see a small "Saving..." pill in the bottom-right confirm. The search box at the top filters across all section cards in real time; type any setting name and irrelevant cards collapse out of view.
What's in each section
- Common Options. The settings most events touch — use discount codes, allow attendees to return and edit, force descriptions to show, enable file uploads, and other broadly-used toggles.
- Emails & Notifications. Confirmation email behavior (who gets it, what it says), admin alerts when new registrations come in, from-address overrides.
- Projects & Communities. Auto-link registrants to Communities or Projects based on the packages or fields they pick.
- Miscellaneous Options. A grab-bag of behavior toggles — preview mode, registration groups, sign-in agreements, certificate awards, and more.
- Access Restrictions. Lock the form down by membership status — Members Only Registration, Make Event Invitation Only, restrict to specific member types, board members only.
- Cross-Reference & Prospects. How registrations flow back into Member or Prospect records — matching, merging, and follow-up automation.
- Invoice and Payment Options. Payment methods accepted, partial-payment behavior, late fees, pay-by-check details, accounting overrides.
Favorites
Next to every setting on the Advanced Options tab is a small heart icon. Click it to favorite that setting. Favorited settings get pinned to a Favorites block at the top of the General Information tab on every event, so the handful you tweak most are always one click away instead of buried in Advanced Options.
The recommended workflow:
- Use Advanced Options for the initial event setup — visit every section card, configure the settings that matter for the event.
- Favorite the handful of settings you find yourself changing most often (e.g. the registration cutoff date, the confirmation email subject, capacity warnings).
- For subsequent edits, work from the Favorites block on the General Information tab without opening Advanced Options at all.
Favorites are saved per-organization and apply to every event your organization runs. Each user manages their own list independently.
Organization-wide configuration
The global Event Registration configuration page lives at Configuration > Event Registration in the main MemberLeap menu (the exact menu path depends on your organization's permission structure). Settings here apply across every event in your organization and act as defaults for new events you create.
You can also reach the global config from the breadcrumb action bar on most event-registration pages by clicking the Config icon (gear).
get started
Membership Management
Advertising network
Tasks
Last Update : August 2026
The Tasks feature is a per-event to-do list. Each event gets its own list of tasks you (or your team) need to handle before, during, or after the event — book the venue, finalize the menu, print badges, send thank-you emails. Tasks have a name, description, due date, priority, and assignee, plus a simple open / complete status. Items stay on the list until you mark them done.
Use Tasks for the operational checklist around running an event, separate from the event's configuration itself. The configuration editor handles "how the event is set up"; the task list handles "what we still need to do to pull it off."
Getting to Tasks
From the event list, click the Event Hub link on an event's card, then click Task List from the Admin Tools section of the hub.
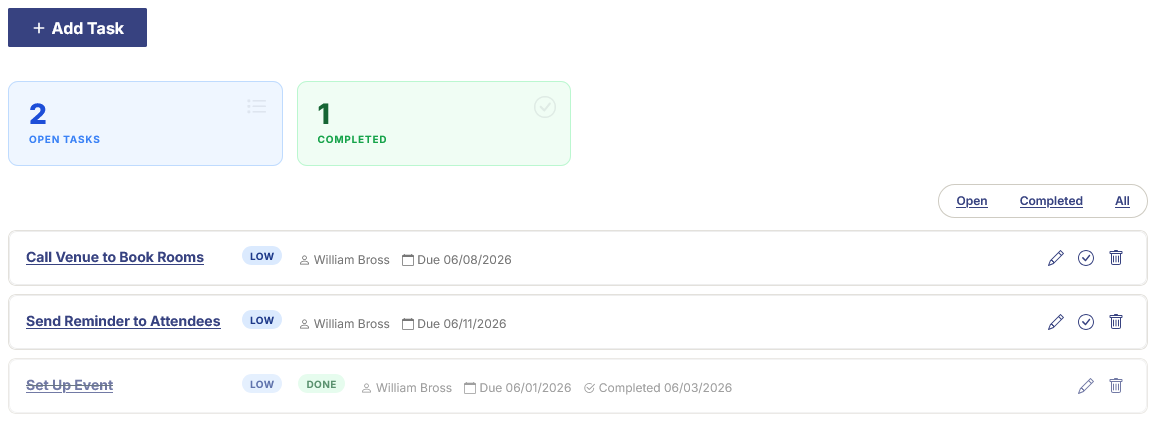
The task list
The top of the page has the Add Task button and a two-stat metric bar:
- Open Tasks — tasks that haven't been marked complete yet.
- Completed — tasks that have been marked done.
Below the stats, every task appears as a row. Each row shows:
- The task name (clickable to edit).
- The priority (Low / Medium / High) as a colored pill.
- The due date.
- The person it's assigned to.
- The completion date (for completed tasks).
- Action icons: Edit, Mark Complete, and Delete.
Tasks are sorted with open ones first (by due date), then completed ones at the bottom. Completed tasks render with strikethrough text and a dimmed background so the open ones are visually prominent.
Adding or editing a task
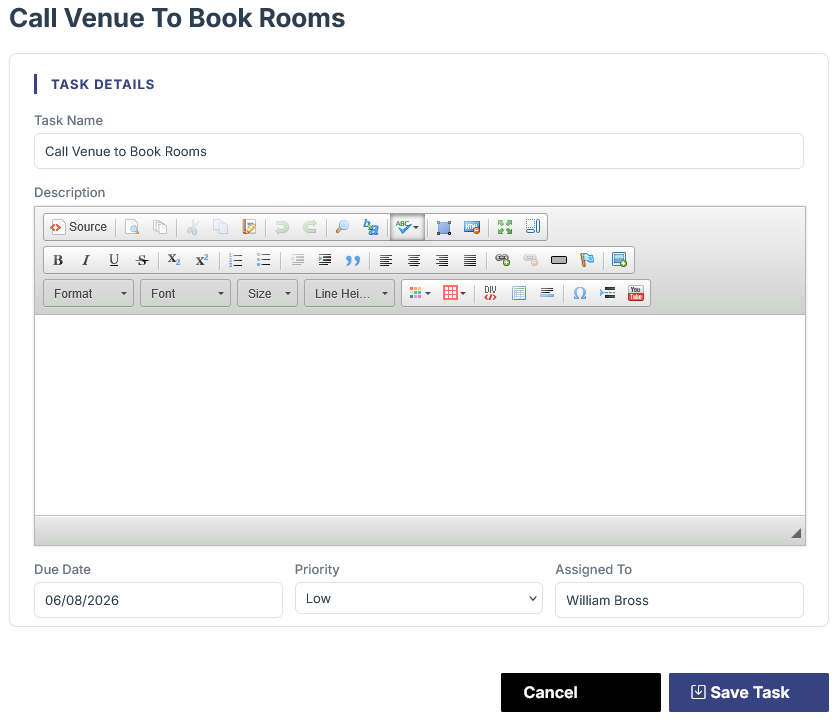
Click Add Task (or the Edit icon on an existing task) to open the task editor in a slide-out panel.
- Task Name. Short headline for the task. Shown on the list and in the editor heading.
- Description. Rich-text block for the full context: what needs to be done, why, links to relevant docs, contact info for the person to coordinate with.
- Due Date. When the task should be done. Optional — leave blank for tasks that don't have a hard deadline.
- Priority. Low, Medium, or High. Affects the colored pill on the task row but doesn't change sort order.
- Assigned To. Free-text name of the person responsible. Not linked to a member record — type whatever name or identifier makes sense for your team.
Click Save Task to commit. The new or edited task appears in the list right away.
Marking a task complete
Click the Mark Complete icon (a checkmark) on any open task's row. A small modal opens asking when the task was completed — defaulted to today, but you can pick any date if you're recording a task you finished earlier and are just now logging.
Click Mark Complete in the modal and the task moves into completed status. It stays on the list (so you can see what's been done), but it's visually de-emphasized and sorted to the bottom.
To reopen a completed task, edit it — the editor lets you change its status back to open if needed.
Deleting a task
Click the Delete icon on any task's row. A confirmation modal asks you to confirm the deletion. Deletion removes the task entirely. Use Delete when a task is no longer relevant (the event scope changed, the work moved elsewhere); use Mark Complete when the task is actually done.
Tips and patterns
- Use the task list as a runbook for the event. When you set up a new event, copy your standard task list pattern into it — book venue, send save-the-date, finalize menu, print badges, etc. The same recurring tasks for the same kind of event become a checklist you work through.
- Tasks are per-event, not org-wide. Each event maintains its own task list. There's no cross-event view; if you need a single pane of all outstanding tasks, you'd visit each event's hub individually. For most workflows the per-event scope is the right one — tasks are inherently tied to a specific event's logistics.
- Use Description for context. The task name should be short and scannable; the description is where you put the details, links, and contact info. A future-you (or a teammate picking up the task) will appreciate having that context handy when they open the task.
- Mark complete with the actual date if you're back-filling. The completion date is part of the audit record — useful if you're ever asked "when did we send the save-the-date for last year's event?" Get in the habit of using the real completion date rather than always defaulting to today.