
New Title
Most settings here are checkboxes or short text fields, and almost everything autosaves the moment you change it — you'll see a small "Saving..." pill in the bottom-right confirm. The search box at the top filters across all section cards in real time; type any setting name and irrelevant cards collapse out of view.
What's in each section
- Common Options. The settings most events touch — use discount codes, allow attendees to return and edit, force descriptions to show, enable file uploads, and other broadly-used toggles.
- Emails & Notifications. Confirmation email behavior (who gets it, what it says), admin alerts when new registrations come in, from-address overrides.
- Projects & Communities. Auto-link registrants to Communities or Projects based on the packages or fields they pick.
- Miscellaneous Options. A grab-bag of behavior toggles — preview mode, registration groups, sign-in agreements, certificate awards, and more.
- Access Restrictions. Lock the form down by membership status — Members Only Registration, Make Event Invitation Only, restrict to specific member types, board members only.
- Cross-Reference & Prospects. How registrations flow back into Member or Prospect records — matching, merging, and follow-up automation.
- Invoice and Payment Options. Payment methods accepted, partial-payment behavior, late fees, pay-by-check details, accounting overrides.
Favorites
Next to every setting on the Advanced Options tab is a small heart icon. Click it to favorite that setting. Favorited settings get pinned to a Favorites block at the top of the General Information tab on every event, so the handful you tweak most are always one click away instead of buried in Advanced Options.
The recommended workflow:
- Use Advanced Options for the initial event setup — visit every section card, configure the settings that matter for the event.
- Favorite the handful of settings you find yourself changing most often (e.g. the registration cutoff date, the confirmation email subject, capacity warnings).
- For subsequent edits, work from the Favorites block on the General Information tab without opening Advanced Options at all.
Favorites are saved per-organization and apply to every event your organization runs. Each user manages their own list independently.
Organization-wide configuration
The global Event Registration configuration page lives at Configuration > Event Registration in the main MemberLeap menu (the exact menu path depends on your organization's permission structure). Settings here apply across every event in your organization and act as defaults for new events you create.
You can also reach the global config from the breadcrumb action bar on most event-registration pages by clicking the Config icon (gear).
get started
Membership Management
Advertising network
Event Registration Reminders
Last Update : August 2026
Reminders are automated emails that go out at a scheduled time before or after the event begins. Unlike one-off messages, reminders are scheduled relative to the event date — "send 7 days before the event," "send 1 day before," "send 2 hours after" — and the system handles the math and the sending automatically. Each reminder fires once, to whichever attendees match its filters at the time it sends.
Use reminders for the recurring nudges every event needs: an early "save the date" sweep, a payment reminder a week out, a "you forgot to upload your headshot" prompt three days out, a "we're starting in an hour" alert the morning of, and a "thanks for coming" message the day after.
Getting to Reminders
From the event list, click the Event Hub link on an event's card, then click
Reminders from the Communications section of the hub.
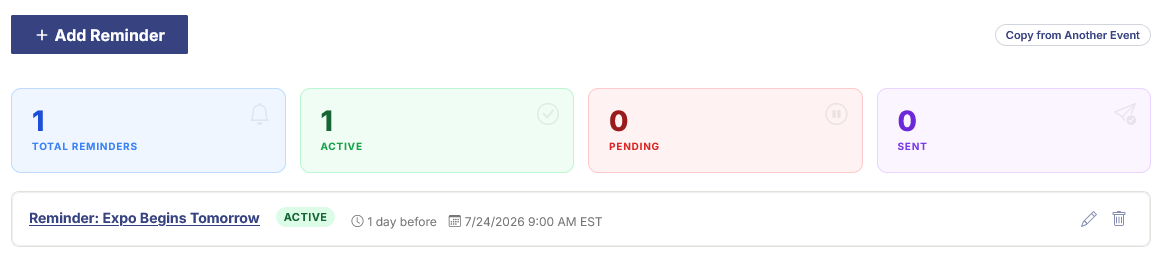
The reminders list
The page shows every reminder you've created for the event. Across the top:
- Add Reminder. Opens the reminder editor in a slide-out panel.
- Copy from Another Event (right side). Opens a picker that lets you copy reminders (including their schedule, subject, body, and filters) from a different event into this one. Useful when you reuse the same reminder cadence year over year.
The metrics bar shows four totals:
- Total Reminders — everything you've created.
- Active — reminders that are turned on and will send when their scheduled time arrives.
- Pending — reminders that exist but are currently disabled (typically because they're still being drafted or have been intentionally paused).
- Sent — reminders that have already fired.
Below the metrics is the list of reminders as cards. Each card shows the reminder name, its current status (Active / Pending / Sent), its schedule, a recipient count, and a set of action icons:
- Edit. Opens the reminder editor.
- Recipients. Shows the list of attendees who match this reminder's filters — useful for verifying the right audience before the send time arrives.
- Copy. Duplicates the reminder within the same event.
- Delete. Removes the reminder. If the reminder has already sent, the underlying send log is preserved for audit.
Creating a reminder
Click Add Reminder. The reminder editor opens with four sections.
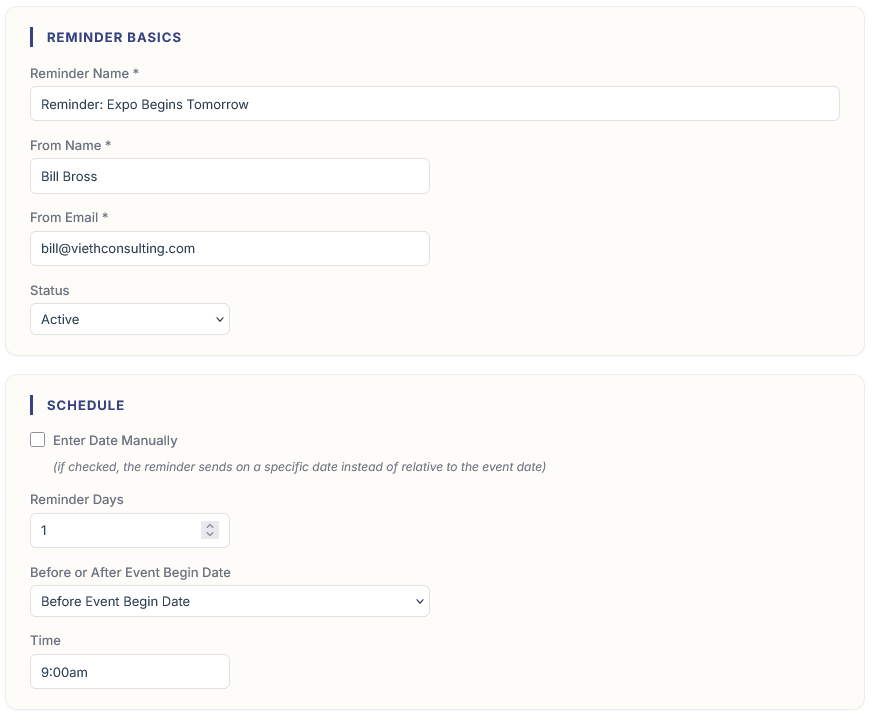
Reminder Basics
- Reminder Name. Internal name shown in the reminder list. Not seen by attendees — for that, use the Subject field in Message Content below.
- From Name and From Email. Who the email appears to come from. Defaults can be set at the organization level and overridden per reminder.
- Status. Pick Active to schedule the reminder for sending, or Pending to keep it as a draft. Pending reminders never fire, regardless of their schedule.
Schedule
Reminders use one of two scheduling modes:
- Relative to the event date (default). Set the number of days and pick Before or After the event's begin date. For example: 7 days before, 1 day before, 2 days after.
- Specific date (override). Check the Enter Date Manually checkbox and pick an exact calendar date. Use this when the reminder doesn't fit cleanly into a "before/after" pattern — e.g. a kickoff message that goes out at the start of a registration window, regardless of when the event is.
Set the Time for when on that day the reminder should send. Reminders are processed by an automated batch job; the time you set is when the system attempts the send. Actual delivery is typically within a few minutes of the configured time.
Recipient Options
By default, reminders go to every attendee on the event who has an email address. The recipient options let you narrow that down.
- Include Event and Attendee Registration Summary. When checked, MemberLeap appends a summary of the attendee's registration (what they signed up for, their custom-field answers) at the bottom of the reminder email. Useful for "here's what you registered for" reminders.
- Only Send to Unpaid Attendees. Restricts the reminder to attendees with an unpaid balance. Useful for payment reminders.
- Enable Filtering By Registration Selections. When checked, you can narrow the audience further by what attendees picked at registration. Pick the packages or custom-field options that qualify someone for the reminder, plus an ANY / ALL rule. For example: send only to attendees who picked the "Conference Pass" package AND the "Wednesday Workshop" custom-field option.
Message Content
- Reminder Email Subject. Subject line attendees see in their inbox.
- Reminder Email Text. A rich-text editor for the body of the email.
- Replacement Keys. A panel next to the editor lists merge codes you can paste into the email body. At send time, each code is replaced with the relevant attendee or event data (attendee name, event name, registration link, etc.). Common ones include
##ATTENDEE_NAME##,##EVENT_NAME##,##EVENT_DATE##, and similar.
Once you save, the reminder appears in the list. If its status is Active, it sits there waiting until its scheduled time arrives, at which point the batch job picks it up and sends.
How the scheduled send works
An automated job runs continuously in the background, checking for reminders whose scheduled time has arrived. When it finds one:
- It evaluates the recipient filters against the current state of the attendee list (so attendees who registered after you created the reminder are still included, as long as they match the filters).
- It sends the email to each matching attendee.
- It marks the reminder as Sent and logs the send.
A separate catch-up routine handles missed sends (e.g. if the batch job was down briefly when the reminder's time arrived). It looks for Active reminders whose scheduled time has passed but that haven't been marked Sent yet, and processes them late. This means an automated reminder will eventually go out even if there's a temporary delay — it won't silently disappear.
The Recipients panel
Before a reminder sends, you can preview who would receive it. Click the Recipients icon on any reminder row to open the recipient panel. The panel shows every attendee who currently matches the reminder's filters — their name, email, status (paid / unpaid), and any custom-field selections relevant to the filter.
This is the best way to sanity-check your filters. If the list looks wrong (too many people, too few, missing someone obvious), you've probably got a filter rule that needs adjusting. Update the reminder, save, then re-open the Recipients panel to confirm the audience is now correct.
Tips and patterns
- Build a reminder cadence once, then copy it forward. Most organizations have a standard cadence (7 days before / 2 days before / morning of / day after). Build it once on a representative event, save each reminder, then use Copy from Another Event on every subsequent event to pull the same cadence in. Adjust per event as needed.
- Test reminders with manual scheduling. When you're testing a new reminder, set its schedule to Specific date with a date about 5 minutes from now and a test recipient list. That way you can preview the actual email in your inbox before turning it loose on real attendees.
- Use "Pending" liberally during setup. Drafts you're still working on should be Pending until you're ready. Switching to Active is a one-click commit — the reminder won't send until its scheduled time, but at least you know it will when that time arrives.
- Date-based reminders adjust if you change the event date. Reminders scheduled relative to the event's begin date recalculate automatically if you edit the event's date. Reminders scheduled on a specific date (the override mode) do not — you'd need to update them manually.
- Use the unpaid filter for payment nudges only. The Only Send to Unpaid Attendees filter is great for payment reminders ("your balance is still outstanding"), but it filters out everyone who's already paid, so don't use it for general event reminders.