
New Title
Most settings here are checkboxes or short text fields, and almost everything autosaves the moment you change it — you'll see a small "Saving..." pill in the bottom-right confirm. The search box at the top filters across all section cards in real time; type any setting name and irrelevant cards collapse out of view.
What's in each section
- Common Options. The settings most events touch — use discount codes, allow attendees to return and edit, force descriptions to show, enable file uploads, and other broadly-used toggles.
- Emails & Notifications. Confirmation email behavior (who gets it, what it says), admin alerts when new registrations come in, from-address overrides.
- Projects & Communities. Auto-link registrants to Communities or Projects based on the packages or fields they pick.
- Miscellaneous Options. A grab-bag of behavior toggles — preview mode, registration groups, sign-in agreements, certificate awards, and more.
- Access Restrictions. Lock the form down by membership status — Members Only Registration, Make Event Invitation Only, restrict to specific member types, board members only.
- Cross-Reference & Prospects. How registrations flow back into Member or Prospect records — matching, merging, and follow-up automation.
- Invoice and Payment Options. Payment methods accepted, partial-payment behavior, late fees, pay-by-check details, accounting overrides.
Favorites
Next to every setting on the Advanced Options tab is a small heart icon. Click it to favorite that setting. Favorited settings get pinned to a Favorites block at the top of the General Information tab on every event, so the handful you tweak most are always one click away instead of buried in Advanced Options.
The recommended workflow:
- Use Advanced Options for the initial event setup — visit every section card, configure the settings that matter for the event.
- Favorite the handful of settings you find yourself changing most often (e.g. the registration cutoff date, the confirmation email subject, capacity warnings).
- For subsequent edits, work from the Favorites block on the General Information tab without opening Advanced Options at all.
Favorites are saved per-organization and apply to every event your organization runs. Each user manages their own list independently.
Organization-wide configuration
The global Event Registration configuration page lives at Configuration > Event Registration in the main MemberLeap menu (the exact menu path depends on your organization's permission structure). Settings here apply across every event in your organization and act as defaults for new events you create.
You can also reach the global config from the breadcrumb action bar on most event-registration pages by clicking the Config icon (gear).
get started
Membership Management
Advertising network
Sign-In Sheet Builder
Last Update : August 2026
The Sign-In Sheet Builder is a visual editor for designing the printed sign-in sheets your event staff hands out at check-in. Each sheet lays out a header with event information at the top and a tabular list of attendees below, with whatever columns you want to track — name, organization, contact info, package, signature line, attendance checkbox, custom-field selections.
The builder generates a print-ready PDF organized one attendee per row. It's especially useful for paper-driven check-in workflows (sessions without scanner gear), for collecting handwritten signatures, or for events that need a take-home roster of attendees.
Getting to the Sign-In Sheet Builder
From the event list, click the
Event Hub link on the event's card, then click
Reporting Dashboard from the Attendees section. In the Reporting Dashboard, switch to the
Sign-In tab and click
Sign-In Sheet Builder.
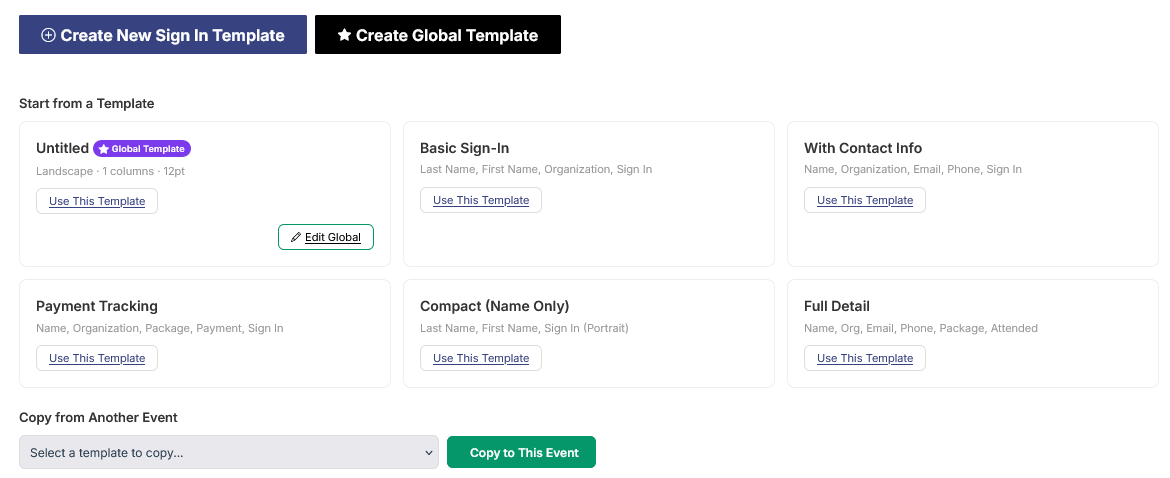
The Sign-In Templates landing page
The landing page is organized into three sections, the same pattern as the Badge Builder.
Your Templates for This Event
Lists every sign-in template saved on this specific event. Each card shows the template's name, orientation, column count, and table font size. Action buttons:
- PDF. Generates the print-ready PDF with one row per attendee.
- Edit. Opens the template in the builder.
- Delete. Removes the template from this event.
Start from a Template
Global templates (organization-wide, marked with a gold star) and five default starters:
- Basic Sign-In. Last Name, First Name, Organization, Sign In.
- With Contact Info. Name, Organization, Email, Phone, Sign In.
- Payment Tracking. Name, Organization, Package, Payment, Sign In.
- Compact (Name Only). Last Name, First Name, Sign In (Portrait orientation).
- Full Detail. Name, Organization, Email, Phone, Package, Attended.
Pick a starter or copy a global template, and the builder opens with that layout pre-populated. From there, every part is editable.
Create New Sign In Template
Top-right action buttons:
- Create New Sign In Template. Starts a blank template just for this event.
- Create Global Template (super-admins only). Starts a blank template available on every event in your organization.
The template builder
The builder splits into a configuration toolbar at the top and a preview area below. The preview is interactive — you build the actual sheet by adding header elements and columns directly in the preview.
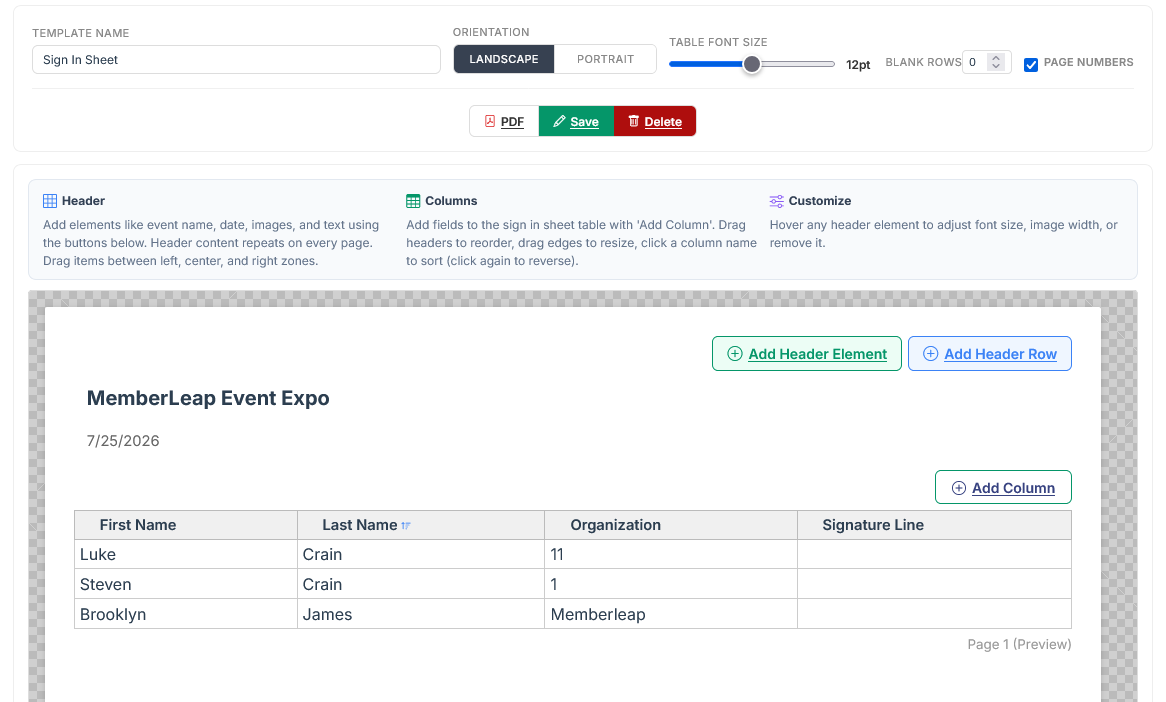
The configuration toolbar
The top toolbar controls template-wide settings:
- Template Name. Internal name shown in the template list.
- Orientation. Landscape or Portrait. Landscape fits more columns; Portrait fits more rows per page.
- Table Font Size. A slider from 8pt to 16pt. Larger fonts are easier to read but fit fewer rows per page.
- Blank Rows. Number of empty rows to leave at the bottom of each sheet for walk-in registrations or anyone not yet in the system. Defaults to 0.
- Page Numbers. Checkbox that adds "Page X of Y" to the bottom of each sheet.
- Save / Generate PDF / Delete. Save commits your changes; Generate PDF produces the print-ready output; Delete removes the template.
The header zones
The top portion of the preview is the sheet's header. It has three zones — Left, Center, and Right — where you can place elements. The header repeats on every page of the sheet, so logos, titles, dates, and location stay visible no matter how long the attendee list is.
Click anywhere in the header to add an element. Available header elements:
- Event Name. The event's name.
- Event Date. The event's begin date, or a date range if you've set an end date.
- Image. Upload any image — logo, sponsor banner, branded graphic. Adjustable width.
- Location. The event's location name from the configuration.
- Full Address. The full venue address (street, city, state, ZIP).
- Category. The event category name from the configuration.
- Custom Text. Any static text you type — "Please sign in upon arrival," "Keep this sheet for your records," etc.
You can drag elements between the three zones to rearrange them. Hover any element to reveal controls for adjusting its font size, image width, or removing it.
The columns table
Below the header, the columns table is where the attendee data goes. Click Add Column to open the column picker. Available columns are grouped by category:
- Standard columns: Last Name, First Name, Organization, Email, Phone, Mobile Phone, Address, City, State, ZIP, Position, Package, Payment Method, Paid, Attended, Signature Line.
- Custom Fields: Any custom field added to the event — text, selection, checkbox, numeric, donation, multiline. Grouped by field type so they're easy to find.
Each column appears as a header in the table preview. From there:
- Drag column headers to reorder them.
- Drag the edge between columns to resize.
- Click a column header to sort the sheet by that column. Click again to reverse the direction.
The preview always shows the actual data from your event's attendees, so what you see is exactly what the printed sheet will look like. Changes are reflected immediately.
Generating the PDF
Click Generate PDF at any time to produce the print-ready output. The PDF opens in a new tab. Print on standard letter or A4 paper depending on your orientation.
Each sheet includes:
- The header content (event name, date, image, etc.) repeated at the top of every page.
- The column-table layout you designed.
- One row per attendee, sorted by your selected column.
- Any blank rows configured at the bottom of the last page for walk-ins.
- Page numbers (when enabled) at the bottom of each page.
Global templates
Templates marked as global (gold star) are available across every event in your organization. Two ways to create one:
- Create Global Template from the landing page (super-admins only).
- From the builder for an event template, save and re-create at the global level. (The current builder doesn't include a "promote to global" button, so you'd recreate the design at the global level when needed.)
When you edit a global template, the builder shows a blue banner reminding you that changes affect every event using that template. Event-specific custom-field columns are stripped automatically when a global template is copied into an event, since custom fields are per-event.
Tips and patterns
- Use Landscape for wide attendee tables. If you're including more than four or five columns, Landscape gives you the horizontal room you need. Portrait works better for shorter column sets where you want more rows per page.
- Add the Signature Line column to encourage handwritten check-in. Standard sign-in sheets traditionally have a signature column. Use Sign In or Signature Line whenever you want attendees to physically sign their name as proof of attendance.
- Test the font size with real data. Long names, long organization names, and long email addresses can crowd at small font sizes. Generate the PDF early and check it on screen before sending to the printer.
- Combine builder PDFs with manual attendance entry. Use printed sheets at the door, then come back to the Attendance Hub afterward to enter check-ins by attendee (or use the By Field view to bulk-mark from the signed sheet).
- Add blank rows for walk-ins. If your event accepts walk-ins, set Blank Rows to 5 or 10 so your check-in staff has somewhere to write down the names of people who weren't pre-registered.