
get started
Membership Management
Advertising network
Packages
Last Update :
Packages are the pricing tiers attendees pick when they register. Every event needs at least one package, even if it's free. Most events have a few: Member, Non-Member, Early Bird, VIP, Spouse, Student, and so on. Each package has its own cost, optional capacity limit, optional date window, optional eligibility rules, and (when applicable) its own confirmation verbiage and certifications.
This article covers how to add, edit, reorder, and remove packages, and what every setting in the package editor does. For specific topics that have their own articles, see Section: Members vs Non-Members and Section: Table Packages.
Managing packages
From the configuration editor, open the Event Packages tab. You'll see the list of packages already on the event, plus a couple of action buttons at the top.
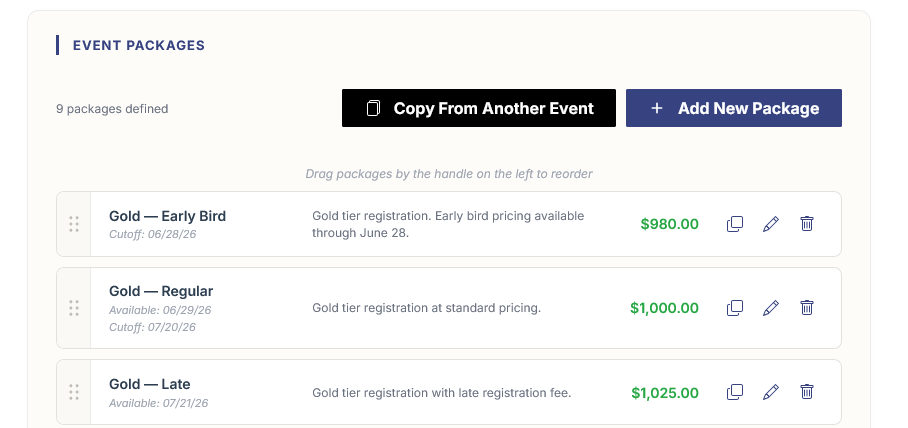
- Add New Package. Opens the package editor in a slide-out panel. Fill in the details, click Save and Continue, and the new package appears in the list below.
- Copy From Another Event. Opens a picker where you choose an existing event. All active packages from that event are copied into this one. Useful when you're running an annual event and the packages don't change year-to-year, or when you want a starting point you can tweak.
Each package in the list is a card. From left to right, a card shows the drag handle, the package name and description, the cost, and the action icons (Edit, Copy, Delete).
- Drag to reorder. Grab the handle on the left of any card and drag it into a new position. That order is what attendees see on the registration form.
- Edit. Opens the package in the slide-out editor.
- Copy. Duplicates the package inside the same event. Useful when you want a near-copy with a different cost or restriction.
- Delete. Removes the package from the event. The delete prompt asks for confirmation, and the action can't be undone — if anyone has already registered for the package, deleting it will affect their records, so be cautious on live events.
The package editor
The package editor opens as a slide-out panel on the right side of the screen and is organized into three sections.
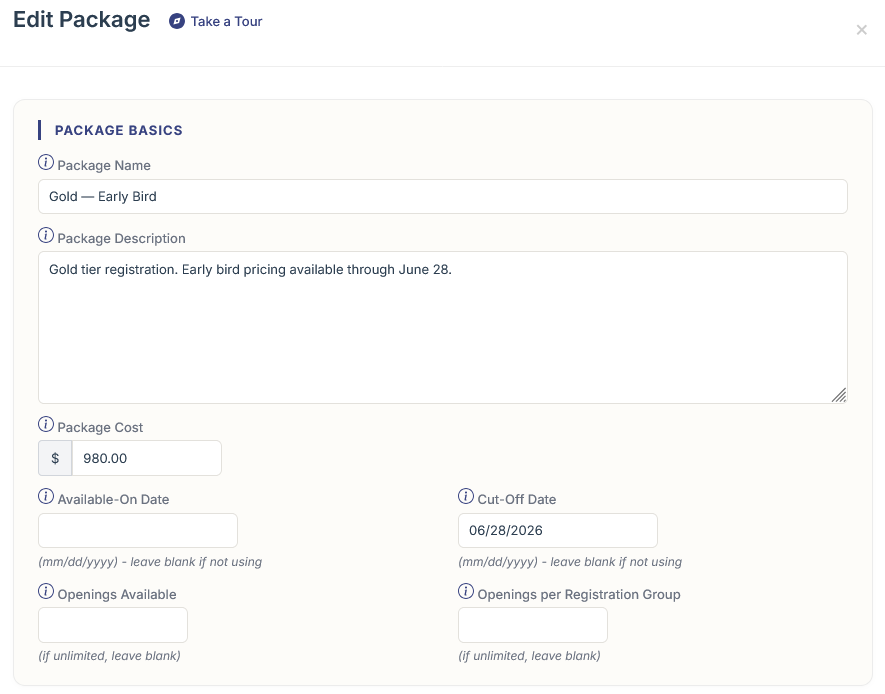
Package Basics
Everything attendees see about the package on the registration form.
- Package Name. The label attendees see when picking the package. Keep it short and clear.
- Package Description. Longer text that appears under the name on the registration form. Use it to spell out what's included, who the package is for, and any caveats.
- Package Cost. The price. Set to 0 for a free package. If your organization has tokens enabled, a Token Amount field also appears next to the cost — that's the number of member tokens this package consumes (see Section: Member Token Purchase and Use).
- Make Package Price Tax Exempt. Available when the event uses a tax rate. When checked, the package cost is treated as tax-exempt even if the event-wide rate would otherwise apply.
- Available-On Date and Cut-Off Date. Date window for when the package is available on the registration form. Leave either blank to skip. Available-On hides the package until that day (useful for early-bird timing); Cut-Off stops sales after that day.
- Openings Available and Openings per Registration Group. Capacity limits for this specific package. Openings Available caps the total across all attendees. Openings per Registration Group caps how many seats a single group can buy in one checkout. Leave either blank for no limit.
Access & Eligibility
Controls who is allowed to pick this package. Most events keep this open to everyone, but you can lock packages down to specific groups when you need to.
- Restricted. When checked, the package is hidden from the public registration form. Only admins entering registrations on someone's behalf can pick it. Use this for comp packages, board-only options, or anything you don't want the general public to see.
- Package Permissions. Pick whether this package is available to Members only, Guests only, Board members only, or Both Members and Guests. When set to Members only, an additional Restrict Package By block appears below with finer controls.
- Restrict Package By (Members only). Layered eligibility filters: Member Type limits the package to one or more member-type codes, Certification requires the attendee to hold one of the selected certifications, Membership Add-On requires a specific paid add-on, and Other Package makes this package unavailable until someone in the registration group has already selected one of the chosen parent packages. Leave any row blank to skip that filter. See Section: Members vs Non-Members for the full breakdown.
- Discount-code gate. A multi-select of discount codes (when any are defined on the event). When set, the package only appears on the registration form if the attendee has entered one of the selected codes. Useful for invite-only or pre-sale tiers.
Miscellaneous Options
Everything else: booth limits, confirmation verbiage, awarded certifications, table-package behavior, and accounting GL mappings.
- Booth options (when the event has booth registration enabled). Two controls: Exclude From Booth Selection removes the package from the booth-map flow entirely, and Booth Limit Per Attendee caps how many booths each attendee on this package can claim. Leave the limit blank or 0 for no cap.
- Confirmation Verbiage. Rich-text block that appears on the confirmation summary and confirmation email when an attendee picks this package. Use it for "what to bring," parking info, dress code, or thank-you messaging. Leave blank to fall back to the event-wide confirmation text.
- Award Certifications. A multi-select of certifications. When the attendee is marked as Attended, the selected certifications are automatically granted to their member record. Use this for CEU events where the package itself implies a credit.
- Table Package. Designate the package as a banquet-style table package or as an additional-attendee slot. Two related options here: This is a Table Package (the parent purchase) and Designated package for Additional Attendees (the zero-cost slots that come with it). When set to This is a Table Package, a Number of attendees included per table field appears below it. See Section: Table Packages for the full setup walkthrough.
- GL Account and Class. Accounting overrides for organizations that route event revenue into specific QuickBooks GL accounts or classes. The controls only appear for orgs with the relevant integration enabled.
Click Save and Continue at the bottom of the panel to commit the package and close the editor. The new or edited package appears in the list on the Event Packages tab right away.
Tip: Take the in-app tour
The package editor has a guided tour. Click the play icon labeled "Take a Tour" in the panel header at the top. The tour walks through every section and highlights the most-used settings. Press Esc to exit.