
New Title
Most settings here are checkboxes or short text fields, and almost everything autosaves the moment you change it — you'll see a small "Saving..." pill in the bottom-right confirm. The search box at the top filters across all section cards in real time; type any setting name and irrelevant cards collapse out of view.
What's in each section
- Common Options. The settings most events touch — use discount codes, allow attendees to return and edit, force descriptions to show, enable file uploads, and other broadly-used toggles.
- Emails & Notifications. Confirmation email behavior (who gets it, what it says), admin alerts when new registrations come in, from-address overrides.
- Projects & Communities. Auto-link registrants to Communities or Projects based on the packages or fields they pick.
- Miscellaneous Options. A grab-bag of behavior toggles — preview mode, registration groups, sign-in agreements, certificate awards, and more.
- Access Restrictions. Lock the form down by membership status — Members Only Registration, Make Event Invitation Only, restrict to specific member types, board members only.
- Cross-Reference & Prospects. How registrations flow back into Member or Prospect records — matching, merging, and follow-up automation.
- Invoice and Payment Options. Payment methods accepted, partial-payment behavior, late fees, pay-by-check details, accounting overrides.
Favorites
Next to every setting on the Advanced Options tab is a small heart icon. Click it to favorite that setting. Favorited settings get pinned to a Favorites block at the top of the General Information tab on every event, so the handful you tweak most are always one click away instead of buried in Advanced Options.
The recommended workflow:
- Use Advanced Options for the initial event setup — visit every section card, configure the settings that matter for the event.
- Favorite the handful of settings you find yourself changing most often (e.g. the registration cutoff date, the confirmation email subject, capacity warnings).
- For subsequent edits, work from the Favorites block on the General Information tab without opening Advanced Options at all.
Favorites are saved per-organization and apply to every event your organization runs. Each user manages their own list independently.
Organization-wide configuration
The global Event Registration configuration page lives at Configuration > Event Registration in the main MemberLeap menu (the exact menu path depends on your organization's permission structure). Settings here apply across every event in your organization and act as defaults for new events you create.
You can also reach the global config from the breadcrumb action bar on most event-registration pages by clicking the Config icon (gear).
get started
Membership Management
Advertising network
Interactive Exhibit Booth Editor
Last Update : August 2026
The Booth Editor lets you design a visual floor plan for trade-show booths, exhibitor halls, golf-sponsorship maps, banquet seating, or any event where attendees pick a specific spot. Booths are placed on a grid (or over a venue floor-plan image you upload), each with their own name, number, price, color, shape, capacity, and description. Attendees see the same map at registration time and click directly on the booth they want.
Behind the scenes, each booth is just a custom field option that knows where it sits visually. Everything you can do with a regular custom field option — pricing, openings/capacity, restricting to specific packages, awarding certifications — you can do with a booth.
This article covers enabling the feature, building a map, configuring individual booths, uploading a background image, and what attendees see at registration time.
Enabling the booth editor
The booth editor needs to be enabled in two places before you can use it.
Organization-wide: Open Configuration > Event Registration in the main menu, expand the Booth Options section, and check Enable Booth Registration for Events. While you're here, you can also configure org-wide booth defaults like whether attendee information shows on chosen booths, whether attendee names are hidden, whether booths are allowed to overlap on the grid, and whether the website header/footer is hidden on the booth-selection page.
Per-event: Open any event in the configuration editor, go to the Booth Map editor (linked from the Event Hub once it's enabled), and flip the master toggle at the top to Enable booth registration for this event. Until that toggle is on, the booth map is hidden from attendees on the registration form even if booths exist.
The two-level enable design lets you keep the booth feature available across your org but flip individual events on or off as needed.
Opening the editor
From the event list, click the Event Hub link on an event's card. In the Event Features section of the hub, click Booth Map. The editor opens full-screen.
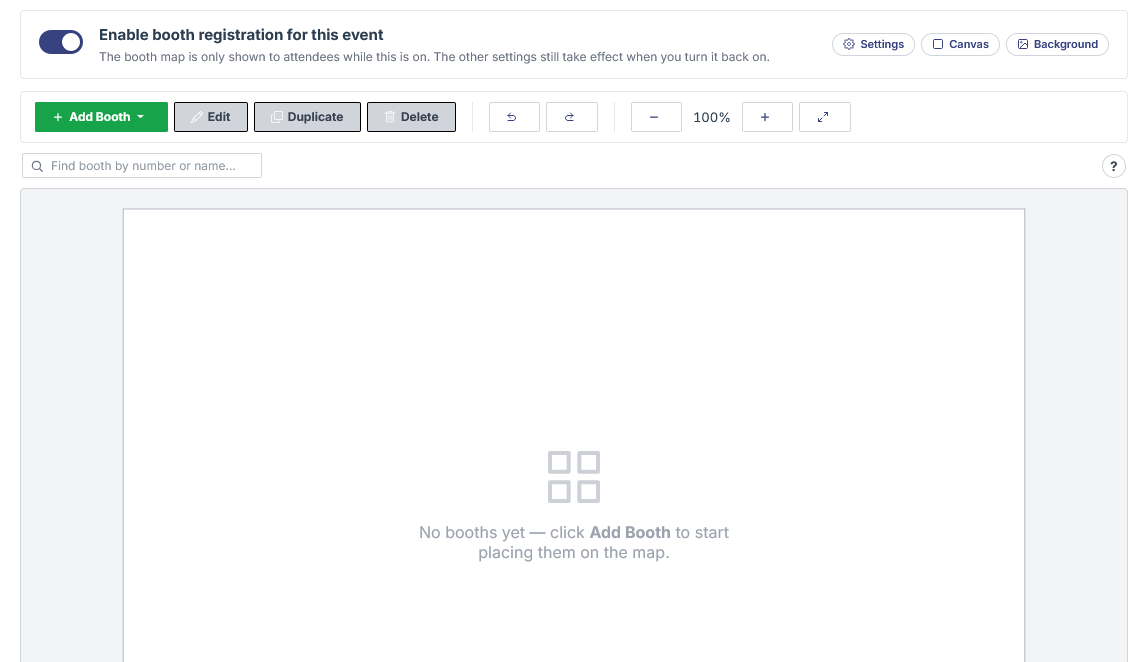
The page has four main areas:
- Master toggle banner at the top. Holds the on/off switch for booth registration on this event, plus three pill buttons for event-wide settings: Settings (behavior toggles), Canvas (grid size and scale), and Background (the venue floor-plan image).
- Quick-reference instructions below the toggle. Summarizes the most-used keyboard and mouse interactions.
- Toolbar with action buttons: Add Booth, Edit, Duplicate, Delete, Undo, Redo, Zoom controls, and (when multiple booths are selected) Align/Distribute.
- Canvas below the toolbar. This is where the floor plan lives. Click any booth to select it, double-click to open its full edit panel.
Building your floor plan
Adding booths
Click Add Booth on the toolbar to open a small menu with three size options:
- Standard — a default 80×80 booth.
- Same as last edited — matches the size of whichever booth you most recently edited. Useful when you're building out a series of same-sized booths.
- Same as selected — only available when a booth is currently selected. Matches that booth's dimensions exactly.
The new booth appears on the canvas with the next available booth number auto-assigned (incrementing from your highest existing number). Drag it to where you want it.
Selecting and moving booths
Click any booth to select it. The selected booth shows resize handles and an edit popover with quick actions. Drag inside the booth to move it, drag a handle to resize it, and use the rotate handle (when shown) to spin it.
To select multiple booths at once, hold Shift and click each one in turn, or drag a marquee rectangle around them on an empty area of the canvas. When 2 or more booths are selected, the toolbar's Align dropdown becomes available with options to align edges, centers, or distribute booths evenly along an axis.
Arrow keys nudge selected booths 1 pixel at a time. Hold Shift to nudge in larger steps. Ctrl+Z undoes the last action; Ctrl+Y (or Ctrl+Shift+Z) redoes. History covers add, delete, move, resize, rotate, panel edits, and arrow-key nudges, so a single undo reverses any one of these atomically.
Smart guides while dragging
As you drag a booth, MemberLeap shows alignment guides — thin colored lines that snap to the edges and centers of nearby booths. These help you align rows of booths cleanly without measuring. The guides disappear when you release the drag.
The right-click context menu
Right-click any booth (or any selection of booths) for a context menu with shortcuts: duplicate, delete, lock, bring to front, send to back, copy/paste. Most of these are also available from the toolbar or keyboard shortcuts, but the context menu groups them per-selection in one place.
Searching for a booth
The search input below the toolbar lets you find a booth by number or name on large floor plans. Type any text and the canvas centers on the matching booth and selects it. Useful when an attendee asks "where's booth 47?" and you're working with a venue that has 200+ booths.
Configuring an individual booth
Double-click any booth (or select it and click Edit on the toolbar) to open the booth properties panel as a slide-out on the right side of the screen. The panel has two sections.
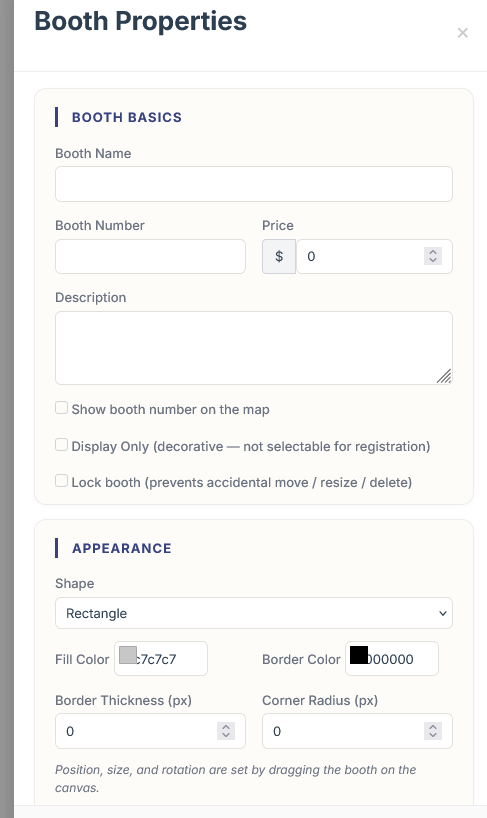
Booth Basics
- Booth Name. The label attendees see when they click the booth at registration. Shown on the hover overlay and in confirmation emails.
- Booth Number. A number or short text that identifies the booth. Shown on the booth itself (when "Show booth number" is on), on hover, and in confirmations. Often used for "2x2" or "Booth A-15" style labels rather than just numeric IDs.
- Price. Cost added to the attendee's invoice when they pick this booth. Behaves like any other costed custom-field option — eligible for discount codes, tax rates, etc. Set to 0 for free booths.
- Description. Longer text shown on the hover overlay when an attendee mouses over the booth.
- Show booth number on the map. When checked, the booth number is rendered directly on the booth shape. Two dependent options appear when this is on: Number Color and Number Font Size.
- Display Only. Marks the booth as decorative — it shows on the map but attendees can't select it. Use this for fixed venue features (registration table, stage, restrooms) that should appear on the floor plan but aren't for sale.
- Lock booth. Prevents the booth from being moved, resized, rotated, or deleted from the editor until unlocked. Useful for anchor booths (the registration table, the stage) so a stray click can't accidentally move them. Separate from attendee-claimed status.
Appearance
Controls how the booth renders on the canvas.
- Shape. Pick from Rectangle, Circle/Oval, Triangle, Pentagon, Hexagon, or Octagon. Most events use rectangles, but irregular shapes are useful for corner booths or non-standard venue features.
- Width and Height. Set the dimensions numerically when you need precision. (For most edits, just drag the corner handles on the canvas directly.)
- Color. Background fill color of the booth. Use color as a visual cue — available booths in one color, sold in another, premium tier in a third.
- Border color, border size, border radius. Fine-tune the outline. Setting a high border radius on a square booth gives you a rounded square; setting it high enough turns a square into a circle.
- Rotation. Rotates the booth on the grid. Useful for angled venue corners or to fit booths into a non-orthogonal layout.
Bulk editing
When you have multiple booths selected and click Edit, the properties panel opens in bulk-edit mode. Per-booth-unique fields (name and number) are hidden — you can't usefully set the same name on 20 different booths. Everything else (price, color, size, shape, lock, display-only) can be applied to the entire selection at once. Useful for "make all the front-row booths $500" or "color the entire back row red" in one operation.
Background image
For venues with a real floor plan (a trade show hall, an event center diagram, a golf course layout), you can upload an image to place behind the booths. The booths sit on top of the image so attendees see the booth positions in context.
To upload one, click the Background pill at the top of the editor. Pick an image (PNG, JPG), set its position and size on the canvas, and toggle the lock setting to prevent it from being accidentally moved while you place booths on top. The lock can be re-toggled anytime — once the background is positioned where you want it, locking it lets you work freely without worrying about clicking through to it.
The background image is also shown on the public registration form, so attendees see the same context you do when picking a booth.
What attendees see at registration time
Once booth registration is enabled and at least one selectable booth is on the canvas, the booth map appears as a step in the attendee's registration flow. They see the canvas you built, can pan and zoom around it, and hover over booths to see name, number, price, and description.
Clicking a booth selects it. Available booths are clickable; already-claimed booths show as taken (color or pattern depending on your settings); display-only booths can be hovered but not selected. Booths can also be filtered out by package tie-ins set at the event level — e.g. only attendees who picked the "Exhibitor" package see exhibitor booths; everyone else sees the floor plan without them.
Per-package booth limits (see Section: Packages) cap how many booths each attendee on a given package can claim — for example, "premium sponsors can claim up to 3 booths; standard sponsors can claim 1."
Reports
The Reporting Dashboard's Fields & Packages tab includes booth-specific reports:
- Booth Report. Shows booth status and assignment info — which booths are claimed, by whom, with what payment status.
- Searchable Booths. A searchable, sortable table version of the booth list with CSV export.
You can also see booth selections on the attendee summary PDF (alongside the attendee's other selections) and on per-package reports that include booth pricing in their totals.
Tips and gotchas
- Build the venue first, then the booths. If you're using a background image, upload and lock it before placing booths. That way you're positioning booths against a fixed reference instead of moving everything together.
- Lock anchor booths early. The registration table, stage, and bar are easy to accidentally move when you're zoomed out. Lock them as soon as they're placed.
- Use color to communicate. Attendees scan the map visually. Color-code by tier, availability, or theme — it dramatically reduces "which booth should I pick?" support email.
- Capacity comes from the Custom Field Option. Each booth's openings limit is set on the booth itself the same way you'd set it on any other selection-field option. Booths with openings = 1 (the default) are claimed by the first attendee to pick them.
- The in-app tour walks the editor. Click the play icon labeled "Take a Tour" in the breadcrumb to launch a step-by-step walkthrough of every section of the editor.