
New Title
Most settings here are checkboxes or short text fields, and almost everything autosaves the moment you change it — you'll see a small "Saving..." pill in the bottom-right confirm. The search box at the top filters across all section cards in real time; type any setting name and irrelevant cards collapse out of view.
What's in each section
- Common Options. The settings most events touch — use discount codes, allow attendees to return and edit, force descriptions to show, enable file uploads, and other broadly-used toggles.
- Emails & Notifications. Confirmation email behavior (who gets it, what it says), admin alerts when new registrations come in, from-address overrides.
- Projects & Communities. Auto-link registrants to Communities or Projects based on the packages or fields they pick.
- Miscellaneous Options. A grab-bag of behavior toggles — preview mode, registration groups, sign-in agreements, certificate awards, and more.
- Access Restrictions. Lock the form down by membership status — Members Only Registration, Make Event Invitation Only, restrict to specific member types, board members only.
- Cross-Reference & Prospects. How registrations flow back into Member or Prospect records — matching, merging, and follow-up automation.
- Invoice and Payment Options. Payment methods accepted, partial-payment behavior, late fees, pay-by-check details, accounting overrides.
Favorites
Next to every setting on the Advanced Options tab is a small heart icon. Click it to favorite that setting. Favorited settings get pinned to a Favorites block at the top of the General Information tab on every event, so the handful you tweak most are always one click away instead of buried in Advanced Options.
The recommended workflow:
- Use Advanced Options for the initial event setup — visit every section card, configure the settings that matter for the event.
- Favorite the handful of settings you find yourself changing most often (e.g. the registration cutoff date, the confirmation email subject, capacity warnings).
- For subsequent edits, work from the Favorites block on the General Information tab without opening Advanced Options at all.
Favorites are saved per-organization and apply to every event your organization runs. Each user manages their own list independently.
Organization-wide configuration
The global Event Registration configuration page lives at Configuration > Event Registration in the main MemberLeap menu (the exact menu path depends on your organization's permission structure). Settings here apply across every event in your organization and act as defaults for new events you create.
You can also reach the global config from the breadcrumb action bar on most event-registration pages by clicking the Config icon (gear).
get started
Membership Management
Advertising network
Event Attendee Portal
Last Update : August 2026
The Attendee Portal is a self-service page that registered attendees log into to see and manage their own registration. It's separate from the main MemberLeap member portal — the Attendee Portal is event-scoped, so each event gets its own portal with content specific to that event. Attendees open it using the confirmation code they receive after registering.
Use the Attendee Portal when you want to give attendees ongoing access to their registration details, a personalized itinerary, an attendee directory to network from, surveys, a check-in QR code, or your own custom content — anything event-specific you'd rather they look up themselves than ask your staff about.
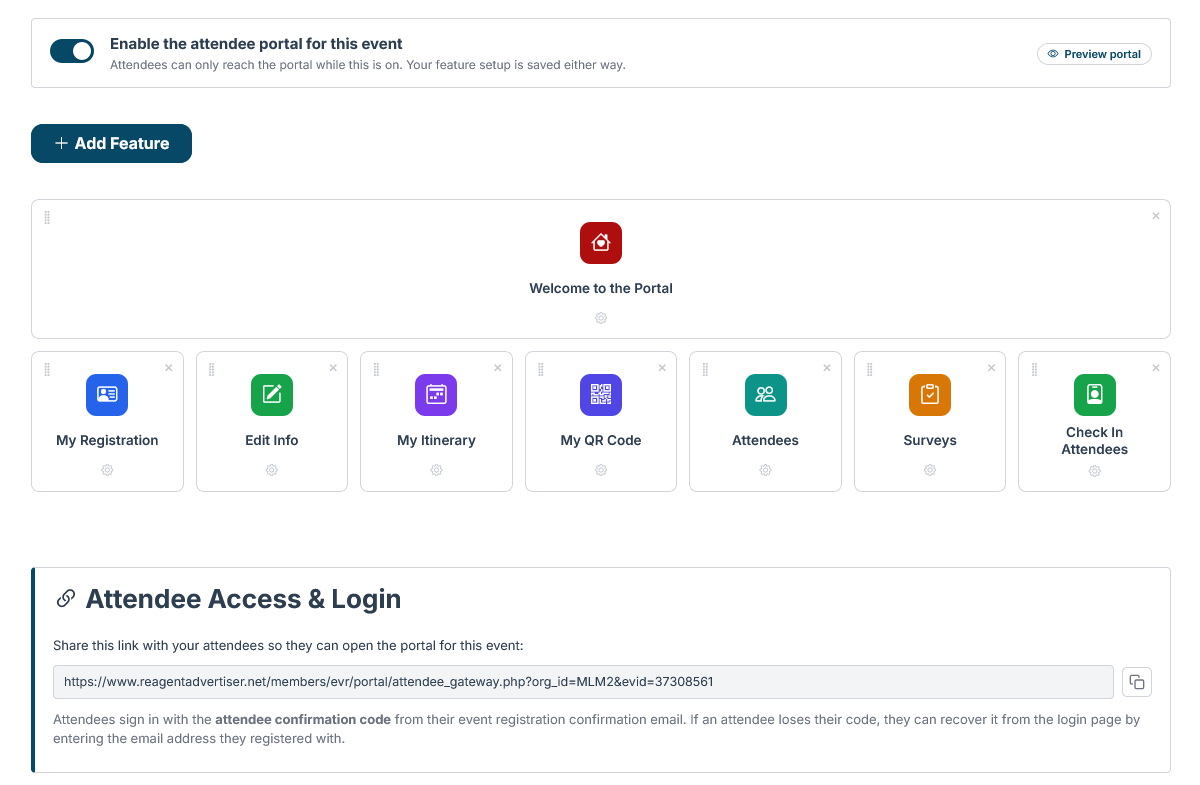
You build the portal in the Portal Builder, a drag-and-drop tool where you add the features (“tiles”) you want, arrange them, and set their names, icons, and colors. The portal always lives at the same link for an event; each attendee sees their own information once they enter their code.
Getting to the Portal Builder
From the event list, click Event Hub on an event's card, then click Portal Builder in the Event Features section of the hub.
Turning the portal on
At the top of the Portal Builder is a master toggle, Enable the attendee portal for this event. Attendees can only reach the portal while this is on. Your feature setup is saved either way, so you can build the whole portal first and flip it on when you're ready — a banner reminds you while it's off.
Building the portal
Click Add Feature to open a menu of everything you can add. Pick a feature and it drops in as a tile. From there:
- Reorder tiles by dragging them by the grip — the order here is the order attendees see.
- Rename a tile in its config panel (the Tab Name field) — this is the label attendees see, so you can call “Attendee Directory” whatever fits your event.
- Set each tile's icon and icon color (a palette swatch or a custom hex).
- Remove a tile with the × — that turns the feature off.
Everything saves automatically as you go. Use Preview portal (top right) to see it exactly as attendees will, with sample data, so nothing live is affected.
Feature tiles
These are the standard features you can add. Each is optional — build a minimal portal or a rich one.
- Welcome. A banner at the top of the portal home screen with a heading and rich-text message. Use it for “welcome, here's what's here” copy, logistics reminders, or last-minute updates. Because it saves instantly, it doubles as a live announcement channel during the event (“today's keynote moved to Room 200”).
- My Registration. The attendee's own registration details.
- Edit Info. Lets attendees update limited parts of their own registration (custom-field answers like meal choice or shirt size). They can't change their package, the people on the registration, or anything that affects billing — those still go through your admin team.
- My QR Code. The attendee's personal QR code for check-in.
- My Itinerary. A personalized schedule showing only the sessions that attendee selected. Content comes from the Itinerary Editor (Section: Itinerary Builder).
- Event Itinerary. The full event agenda in the portal (everyone's schedule, not just theirs). Also fed by the Itinerary Editor.
- Attendee Directory. A list of who else is attending, for networking. (This is the portal's directory; the separate public attendee list that appears on the event landing page is set on the Advanced Options tab — see Section: Configuration.)
- Surveys. The event's surveys, so attendees can respond without digging up the original invitation email.
- Self Check-In and Admin Check-In. Camera-scanner tiles for QR check-in. Admin Check-In is only visible to attendees whose member record is an event/full/partial admin (and in the admin preview); regular attendees never see it. These require the org's phone-scanning feature.
Custom Content tabs
Under Custom Content in the Add Feature menu you can add as many extra tabs as you like, each a specific type:
- Rich Text — a free-form formatted block (travel & lodging, sponsor thank-yous, anything).
- Link List — a tidy list of links.
- FAQ — expandable question/answer entries.
- Announcements — dated notices.
- Sponsors and People — logo/photo cards with names, roles, links, and a blurb.
- Gallery — an image grid with a lightbox.
- Embed — paste a YouTube/Vimeo video, Google Map/Form/published Doc, or Spotify/SoundCloud link and it embeds inline.
Image-bearing tabs (gallery, sponsor logos, person photos) upload images right in the builder. Give each tab a name, icon, and color like any other tile.
Intro text
Every content tab and most feature tiles have a small Text icon in their config row (between the tab name and the icon picker). Click it to open a rich-text editor and add intro text that appears above that tab's content on the portal — a sentence or two of context (“Here's who's presenting this year” above People, instructions above Surveys, “show this at the registration desk” above My QR Code). The Text icon fills in with color once a tab has intro text. Welcome (which is already all message) and Rich Text tabs don't have it.
How attendees get in
At the bottom of the Portal Builder is the Attendee access & login panel. It shows the public portal link for this event and a copy button. Share that link with attendees.
Attendees sign in with the attendee confirmation code from their registration confirmation email — the code acts as their password, so there's no separate username or account. Make sure your confirmation email includes both the code and the portal link. If an attendee loses their code, they can recover it from the login page by entering the email address they registered with.
Tips and patterns
- Build first, enable last. Feature setup saves even while the portal is off, so lay everything out, preview it, then flip the master toggle on.
- Use the Welcome banner as a live channel. Updating it is faster than sending an event message and doesn't fill inboxes — great for day-of changes.
- The personalized itinerary is the standout feature. If your event has any session selection, add the My Itinerary tile — attendees get a clean view of just their day.
- Think before enabling the Attendee Directory. Some attendees don't want their name shown to others; confirm your event culture supports it, especially for sensitive events.
- Put the portal link in the confirmation email. The portal is only useful if attendees can find it — the link plus their code should be right in the email they already get.