
New Title
Most settings here are checkboxes or short text fields, and almost everything autosaves the moment you change it — you'll see a small "Saving..." pill in the bottom-right confirm. The search box at the top filters across all section cards in real time; type any setting name and irrelevant cards collapse out of view.
What's in each section
- Common Options. The settings most events touch — use discount codes, allow attendees to return and edit, force descriptions to show, enable file uploads, and other broadly-used toggles.
- Emails & Notifications. Confirmation email behavior (who gets it, what it says), admin alerts when new registrations come in, from-address overrides.
- Projects & Communities. Auto-link registrants to Communities or Projects based on the packages or fields they pick.
- Miscellaneous Options. A grab-bag of behavior toggles — preview mode, registration groups, sign-in agreements, certificate awards, and more.
- Access Restrictions. Lock the form down by membership status — Members Only Registration, Make Event Invitation Only, restrict to specific member types, board members only.
- Cross-Reference & Prospects. How registrations flow back into Member or Prospect records — matching, merging, and follow-up automation.
- Invoice and Payment Options. Payment methods accepted, partial-payment behavior, late fees, pay-by-check details, accounting overrides.
Favorites
Next to every setting on the Advanced Options tab is a small heart icon. Click it to favorite that setting. Favorited settings get pinned to a Favorites block at the top of the General Information tab on every event, so the handful you tweak most are always one click away instead of buried in Advanced Options.
The recommended workflow:
- Use Advanced Options for the initial event setup — visit every section card, configure the settings that matter for the event.
- Favorite the handful of settings you find yourself changing most often (e.g. the registration cutoff date, the confirmation email subject, capacity warnings).
- For subsequent edits, work from the Favorites block on the General Information tab without opening Advanced Options at all.
Favorites are saved per-organization and apply to every event your organization runs. Each user manages their own list independently.
Organization-wide configuration
The global Event Registration configuration page lives at Configuration > Event Registration in the main MemberLeap menu (the exact menu path depends on your organization's permission structure). Settings here apply across every event in your organization and act as defaults for new events you create.
You can also reach the global config from the breadcrumb action bar on most event-registration pages by clicking the Config icon (gear).
get started
Membership Management
Advertising network
Event List
Last Update : August 2026
The Event List is the home page of the Event Registration module. It's the first thing you see when you click Event Registration from the main admin menu, and it's where you'll come back to whenever you want to jump between events. Every event your organization has ever created lives here — current, upcoming, and past.
The page is a search-and-filter view over your event catalog, with a card-based layout that makes it easy to scan event status at a glance. From here you can open an event into its Hub, jump straight to its registration link, edit, copy, or delete it, and reach administrative tools that operate across all events.
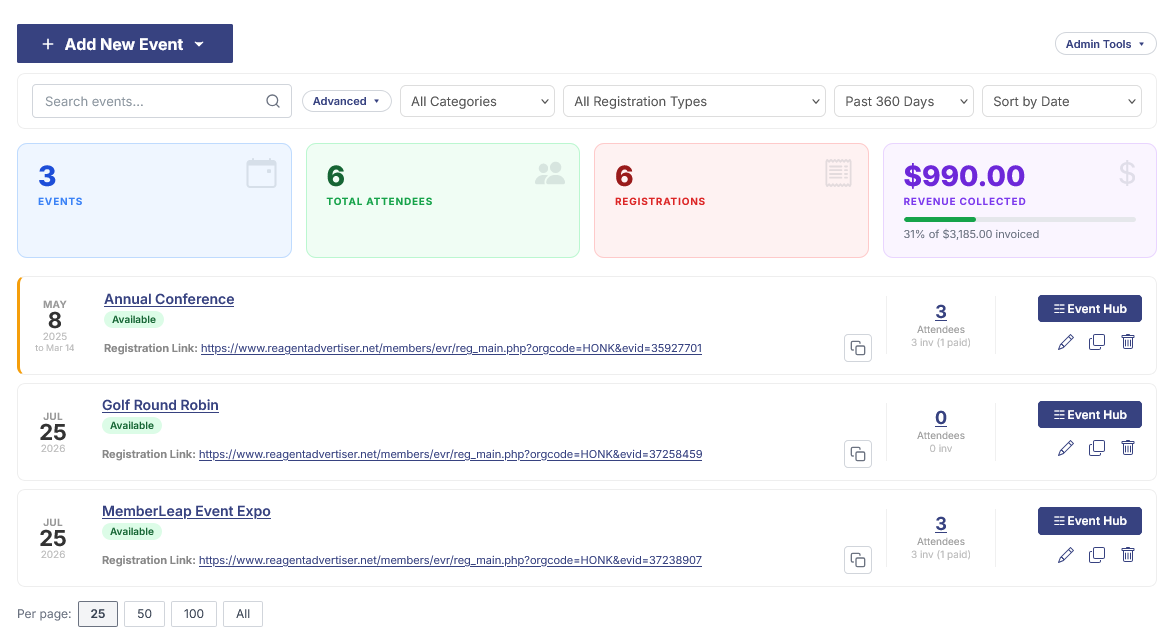
The title row
At the top of the page is the title row. On the left is the page title and the Add New Event button. On the right (pushed all the way over) is the Admin Tools toggle.
Add New Event
Clicking the Add New Event button opens a dropdown with four ways to start a new event:
- Use Gabi to Create an Event — opens the AI-powered event builder where you describe the event in plain English and Gabi builds out the configuration. See Section: Create with Gabi for details. Only appears for orgs that have not opted out of AI features.
- Start From Template — opens a panel listing event templates. Templates are events you've previously marked as templates and can be cloned as starting points for new events.
- From Calendar Event — opens a modal that lets you create a new event from an existing entry on your organization's calendar. Useful when the event already exists as a calendar item and you want to add registration on top of it.
- Clean Start — creates a brand-new event with default settings. The most common choice when you have no existing structure to start from.
Admin Tools
The Admin Tools toggle expands a slidedown panel below the title row with tools that operate across all events instead of any single event. Contents vary by permission and org features, but typically include:
- Search & Reports — Attendee Search (find a person across all events), All-Event Reports (financials and attendance rolled up across the whole catalog), Upcoming Reminder Report, and various org-specific reports.
- Configuration — Categories (event categorization tags), Authorized Email Domains (controls which domains can register without member status), and feature-specific configuration like Adjudicator Types or Stage Types when those features are enabled.
If you can't see Admin Tools on the page, your account doesn't have the EVR admin permissions required to use them.
The search toolbar
Below the title row is the filter and search toolbar. On mobile, this collapses behind a Search Filters button to save vertical space. The controls compose — setting Category and Status both at once narrows by both at the same time:
- Text search — freeform name search. Matches against event names.
- Advanced Search — opens a modal for searching by event name, description keywords, date range, contact name, contact email, and location state. Useful when you have hundreds of events and need to narrow on multiple criteria. Advanced search also has a Templates Only toggle for browsing your template library.
- Category — filter to events tagged with a specific category.
- Status — filter by availability state (Available, Disabled, Closed, etc.).
- Within — date range filter (next 7 days, next 30 days, next year, etc.).
- Past Events — the list shows future events by default. This dropdown surfaces past events by year, or shows all past events.
- Order By — sort the list by date (closest first), name, or creation order.
When any filter is active, a summary of active filters appears just above the event cards as removable chips. Click a chip's × to clear that one filter and keep the rest.
The event cards
Each event appears as a card in the main area. Cards include:
- Event name — clicking it opens the Event Hub for that event (Section: Event Hub).
- Status badge — color-coded indicator of the event's availability state.
- Meta line — dates, location, attendee count, and category.
- Registration link — quick-copy link to the public sign-up page.
- Event Hub link — alternate way to jump straight to the Hub.
- Action icons — Edit (goes to the configuration editor), Copy (clones the event as a starting point for a new one), and Delete (with confirmation). Visible only to users with edit permission.
Pinned events — events you've marked as important — appear at the top of the list with a visual indicator. Pinning is useful for keeping your active "in-progress" event at the top while you're working on it.
Permission-based visibility
The Event List respects role-based access. Full EVR admins see all events and all controls. Limited EVR users see all events but with fewer action icons. Members assigned as event admins for specific events through the Event Admins tool (Section: Partial Admin Access) see only the events they've been assigned to, plus a stripped-down toolbar without the global admin controls. The Add New Event button only appears for users with permission to create events.
Tips and patterns
- Use status filters to keep the list manageable. Filtering to Available status hides events you've already closed or disabled. Filtering by category narrows further.
- Pin the event you're actively building. Pinning keeps it at the top of the list so you don't have to search for it every time you come back. Unpin when you launch.
- Copy is the fastest way to start an annual event. Click Copy on last year's event and the new copy keeps the configuration, custom fields, packages, and verbiage. You just update the dates and tweak from there.
- The advanced search Templates Only mode is your template library. If you maintain reusable templates for different event types, switching the advanced search modal into Templates Only mode shows just those.
- Use Past Events for historical reporting. Past events stay in the system forever. When you need to look something up from a past event, surface it through the Past Events dropdown rather than scrolling.