
New Title
Most settings here are checkboxes or short text fields, and almost everything autosaves the moment you change it — you'll see a small "Saving..." pill in the bottom-right confirm. The search box at the top filters across all section cards in real time; type any setting name and irrelevant cards collapse out of view.
What's in each section
- Common Options. The settings most events touch — use discount codes, allow attendees to return and edit, force descriptions to show, enable file uploads, and other broadly-used toggles.
- Emails & Notifications. Confirmation email behavior (who gets it, what it says), admin alerts when new registrations come in, from-address overrides.
- Projects & Communities. Auto-link registrants to Communities or Projects based on the packages or fields they pick.
- Miscellaneous Options. A grab-bag of behavior toggles — preview mode, registration groups, sign-in agreements, certificate awards, and more.
- Access Restrictions. Lock the form down by membership status — Members Only Registration, Make Event Invitation Only, restrict to specific member types, board members only.
- Cross-Reference & Prospects. How registrations flow back into Member or Prospect records — matching, merging, and follow-up automation.
- Invoice and Payment Options. Payment methods accepted, partial-payment behavior, late fees, pay-by-check details, accounting overrides.
Favorites
Next to every setting on the Advanced Options tab is a small heart icon. Click it to favorite that setting. Favorited settings get pinned to a Favorites block at the top of the General Information tab on every event, so the handful you tweak most are always one click away instead of buried in Advanced Options.
The recommended workflow:
- Use Advanced Options for the initial event setup — visit every section card, configure the settings that matter for the event.
- Favorite the handful of settings you find yourself changing most often (e.g. the registration cutoff date, the confirmation email subject, capacity warnings).
- For subsequent edits, work from the Favorites block on the General Information tab without opening Advanced Options at all.
Favorites are saved per-organization and apply to every event your organization runs. Each user manages their own list independently.
Organization-wide configuration
The global Event Registration configuration page lives at Configuration > Event Registration in the main MemberLeap menu (the exact menu path depends on your organization's permission structure). Settings here apply across every event in your organization and act as defaults for new events you create.
You can also reach the global config from the breadcrumb action bar on most event-registration pages by clicking the Config icon (gear).
get started
Membership Management
Advertising network
Manage Invite Only List
Last Update : August 2026
The Manage Invitee List tool is where you build and maintain the list of members who are allowed (or invited) to register for an event. It's used for two related but distinct purposes:
- Invite-only events — events that gate registration behind an invitation. Only members on the invitee list can register. Anyone else who tries to access the registration link is told the event is closed to them.
- Open events with RSVP gauging — events that are open to anyone but where you want to send a personalized invitation email and track who has responded. Use the invitee list to build the recipient set for invitation rounds. See Section: RSVP for the broader pattern of sending invites and tracking interest before opening registration.
Before the Manage Invitee List card appears on the Event Hub, the event has to be marked as invite-only. Open the event in the configuration editor, go to Advanced Options, and turn on the Invite Only Event setting. Save the event — the next time you load the Event Hub, the Manage Invitee List card will be there in the Attendees section. Without that flag turned on, the tool is hidden because there's nothing for it to do (anyone can register on a non-invite-only event, so there's no list to maintain).
The tool is reached from the Event Hub via the
Manage Invitee List card (shown for invite-only events) or the
Send Invitation card in the Communications section.
Layout
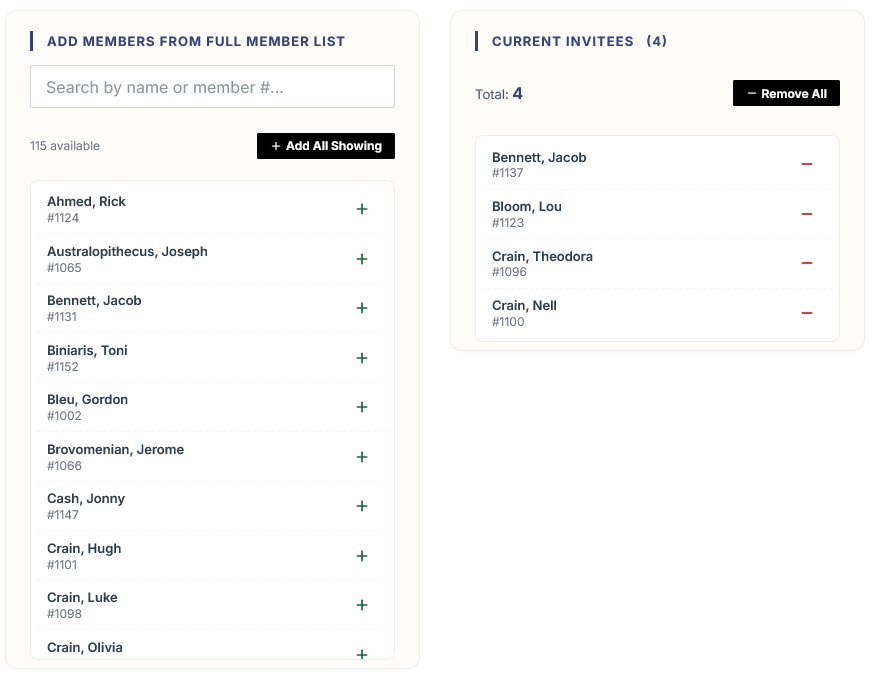
The Manage Invitee List page is split into two columns:
- Left column — Add members. Tools for adding members to the invitee list, including a searchable list of all members, an option to pull invitees from a previous event, bulk tools, and the link to send invitations.
- Right column — Current Invitees. The live invitee list with a count, search/filter, and remove controls.
Adding or removing an invitee updates the right column immediately via AJAX. There's no save button — each click is committed as you go.
Adding invitees
You have several ways to build the invitee list:
Add from the full member list
The top section of the left column shows a searchable list of every active member in your organization. Type into the search box to filter. Each row has a + button that adds that member to the invitees with one click. Use the Bulk Add All button to add everyone currently visible (respecting any active search filter) in one shot.
Add from a previous event
Below the full member list is an "Add Members from a Previous Event" section. Pick a past event from the dropdown and the system pulls everyone who registered for that event. Useful for annual events where you want to invite last year's attendees back. There's also an "Add Approved Members from a Previous Event" variant for orgs that use approval workflows — this pulls only the members who were marked as approved, not everyone who applied.
Bulk Tools
The Bulk Tools section in the left column gives you bulk-add paths that handle larger inputs:
- Pick from Application Pool — if your org collects pre-registrations or applications, pull qualified applicants directly into the invitee list. The picker shows each pool entry with enough context to pick or skip.
- Add Multiple from Pool — bulk-add everyone in the application pool with a single confirmation.
- Add via Email List — paste a list of email addresses. The system matches each to a member record and adds the matches to the invitee list. Useful when you have an external list of names you want to invite.
- Add via Member Type — pick one or more member types and add everyone in those types. The fastest path when "we want to invite everyone who is a Premier Member" describes the audience.
The current invitee list
The right column shows everyone currently on the invitee list. Each row includes:
- Member name (with any certification glyphs they hold)
- Member type and other meta
- Status indicators — whether they've been sent an invitation, whether they've registered, whether they've RSVP'd
- A remove button to take them off the invitee list
The invitee count at the top of the column is live — it ticks up and down as you add and remove people. There's a search box to filter the list when it gets long, and a Bulk Remove option for clearing many at once.
Sending invitations
Once the invitee list is built, click Send Invitations at the bottom of the Bulk Tools section to open the send page. This is the email composer that sends each invitee a personalized invitation message.
The send page
The send page has several sections:
- From Name and From Email — the sender identity. Defaults to the logged-in admin's name and email. Customize if you want it to come from a specific person (the event chair, the membership director, etc.).
- Message body — the email content. Use merge codes (##FIRST_NAME##, ##EVENT_NAME##, ##EVENT_RSVP_LINK## for RSVP-enabled events) to personalize.
- Recipients — the list of invitees with a checkbox next to each one. Anyone who has already registered for the event is automatically excluded. For multi-round invitation campaigns, the system also marks invitees who have already received an invitation (with the original send date), and leaves those unchecked by default so you don't bother them again.
Use Select All and Clear All at the top of the recipient list to quickly toggle everyone. Then click Send Emails to deliver.
Multi-round campaigns
A common pattern is to send invitations in waves — an initial invite, then follow-ups to people who haven't responded after a few weeks. Each time you visit the send page:
- Anyone who has already registered is silently excluded from the list.
- Anyone who has already received an invitation in a previous round shows the original send date and is unchecked by default.
- Anyone newly added to the invitee list since the last send is checked by default.
This lets you send to "everyone who hasn't responded yet" by simply checking the previously-sent rows and hitting Send Emails. For RSVP events, people who have RSVP'd no will not be re-invited; people who RSVP'd yes are converted to registrations and skipped automatically.
Tips and patterns
- Build the list before you mark the event invite-only. If you turn on invite-only and then start building the list, members who try to register in the meantime get told they're not invited. Build the list first, then flip the switch.
- For annual events, "add from previous event" is your fastest path. Pull last year's attendees, prune any you don't want to re-invite, and you have your list in two clicks.
- Use member types for sponsor-only or member-tier events. If the event is for Platinum sponsors only, add everyone in the Platinum Sponsor member type with one bulk action.
- Don't forget the ##EVENT_RSVP_LINK## merge code on RSVP events. Without it, recipients have no way to actually respond. The invitation message becomes a dead-end announcement.
- The send page is the only place RSVP links go out. The regular Event Messages tool (Section: Event Registration Messages) sends to attendees, not invitees, so it can't include the RSVP link in any meaningful way. Use the Send Invitations flow specifically for invitation rounds.
- Use the search filter on long lists. Once you've added 200+ members, the invitee column gets hard to scan. The search box filters by name and email so you can quickly find a specific person to remove or check on.