
New Title
Most settings here are checkboxes or short text fields, and almost everything autosaves the moment you change it — you'll see a small "Saving..." pill in the bottom-right confirm. The search box at the top filters across all section cards in real time; type any setting name and irrelevant cards collapse out of view.
What's in each section
- Common Options. The settings most events touch — use discount codes, allow attendees to return and edit, force descriptions to show, enable file uploads, and other broadly-used toggles.
- Emails & Notifications. Confirmation email behavior (who gets it, what it says), admin alerts when new registrations come in, from-address overrides.
- Projects & Communities. Auto-link registrants to Communities or Projects based on the packages or fields they pick.
- Miscellaneous Options. A grab-bag of behavior toggles — preview mode, registration groups, sign-in agreements, certificate awards, and more.
- Access Restrictions. Lock the form down by membership status — Members Only Registration, Make Event Invitation Only, restrict to specific member types, board members only.
- Cross-Reference & Prospects. How registrations flow back into Member or Prospect records — matching, merging, and follow-up automation.
- Invoice and Payment Options. Payment methods accepted, partial-payment behavior, late fees, pay-by-check details, accounting overrides.
Favorites
Next to every setting on the Advanced Options tab is a small heart icon. Click it to favorite that setting. Favorited settings get pinned to a Favorites block at the top of the General Information tab on every event, so the handful you tweak most are always one click away instead of buried in Advanced Options.
The recommended workflow:
- Use Advanced Options for the initial event setup — visit every section card, configure the settings that matter for the event.
- Favorite the handful of settings you find yourself changing most often (e.g. the registration cutoff date, the confirmation email subject, capacity warnings).
- For subsequent edits, work from the Favorites block on the General Information tab without opening Advanced Options at all.
Favorites are saved per-organization and apply to every event your organization runs. Each user manages their own list independently.
Organization-wide configuration
The global Event Registration configuration page lives at Configuration > Event Registration in the main MemberLeap menu (the exact menu path depends on your organization's permission structure). Settings here apply across every event in your organization and act as defaults for new events you create.
You can also reach the global config from the breadcrumb action bar on most event-registration pages by clicking the Config icon (gear).
get started
Membership Management
Advertising network
Attendee Member Match
Last Update : August 2026
The Attendee Member Match tool reconciles event attendees with member records in your database. When someone registers for an event, they may or may not already exist as a member. Some are existing members who logged in and registered (those are linked automatically). Others typed their name and email into the public form without ever being attached to a member record — those attendees exist as registrations but aren't connected to any member account.
The Member Match tool finds those unlinked attendees, suggests likely matches based on name and email, and gives you tools to either confirm the match, create a new prospect account, or leave the attendee unlinked. Running it after registration closes ensures your member database stays accurate and that future event invitations, dues notices, and reporting all reference the right people.
The tool is reached from the Event Hub by clicking the
Reporting Dashboard card, then selecting
Attendee Member Match from the report menu.
Why this matters
An event with 200 attendees but only 150 of them linked to member records is a reporting problem. The 50 unlinked attendees show up as anonymous names in dues reports, can't be re-invited through the member system, won't be included in member-only mailings, and don't get credit toward "events attended" history. Running Member Match after the event resolves those gaps in a few minutes.
It's also useful during pre-event setup — if you imported a list of registrants from an external source (a sponsor portal, a CSV from a partner org, etc.), Member Match identifies which ones already exist as members and which need new prospect accounts created.
The stats cards
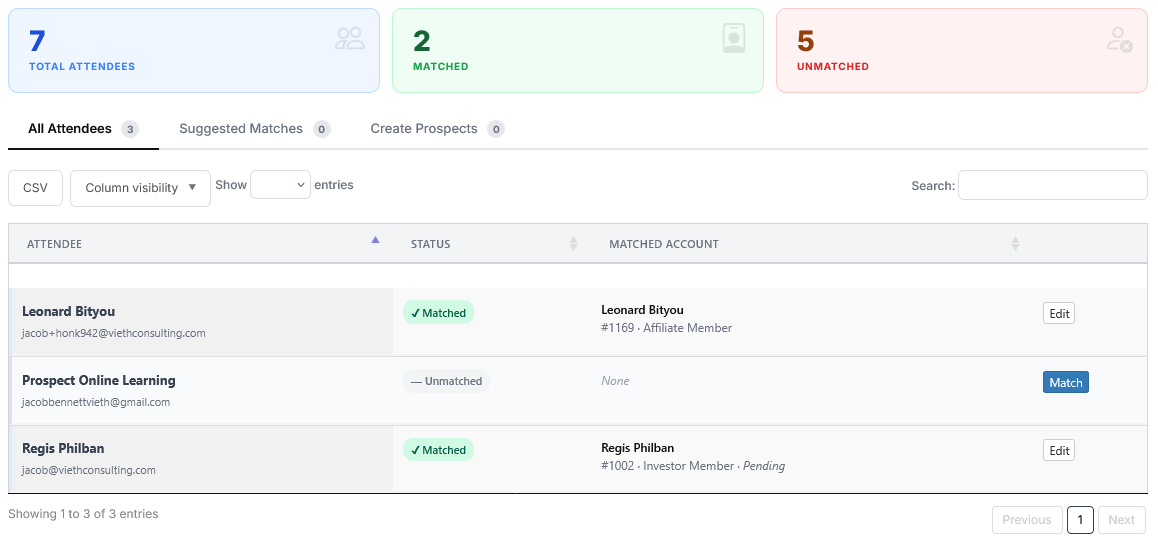
At the top of the page, three stat cards summarize the current state:
- Total Attendees — everyone registered for this event.
- Matched — attendees who are already linked to a member record.
- Unmatched — attendees who are not linked to any member record. This is what you're here to fix.
The goal is to drive Unmatched down to zero (or as close as the data allows).
The three tabs
The tool organizes work into three tabs across the top of the page. Each tab targets a different stage of the matching process:
All Attendees
The full attendee list with each person's current match state. Every row shows the attendee's name, status (Matched or Suggested), the linked or suggested member account if any, and a Match or Edit button.
Click Match on an unmatched attendee to open a side drawer where you can search the full member list and pick the right person. Click Edit on a matched attendee to change or clear the link.
The side drawer is the workhorse of the tool. It shows the attendee's submitted name and contact info, any suggested match the system has identified, and a typeahead member picker for searching by name. You can:
- Accept the suggested match — one click confirms the link.
- Dismiss the suggestion — tells the system "no, this isn't a match" and moves on.
- Search and pick manually — type a name into the member picker to find the right person.
- Clear the link — if a previous match was wrong, unlink it.
Suggested Matches
The middle tab filters to just the attendees the system thinks it has identified. The matching engine looks at:
- Email match — the attendee's email matches an existing member's email exactly (highest confidence).
- Name match — first name and last name both match a member record exactly. Less confident than email matches because of common names.
Each row in this tab shows the attendee, the best member candidate the system found, and a confidence indicator. Use the checkboxes plus the Accept Selected Matches button to bulk-confirm matches in one shot. This is the fastest way to clear an event — review the suggested matches, uncheck any that look wrong, and accept the rest in a single click.
For matches you're unsure about, leave them unchecked here and review them individually in the All Attendees tab
Create Prospects
The right tab shows attendees with no match and no suggestion — people who appear nowhere in your member database. For these, the right move is usually to create a new prospect account so they show up in the member system for future outreach.
Each row has a checkbox (checked by default), the attendee's name, and their email. Below the table are two options that apply to the bulk creation:
- Prospect Type — which member type to assign to the new prospect accounts. Only non-dues-paying member types are offered (so you're not accidentally creating "Active Member" records that should require payment). The dropdown defaults to whichever type your org uses for general prospects.
- Auto-assign username & password — if checked, each new prospect gets login credentials generated automatically. Useful if you want them to be able to log in later.
- Send welcome email — if checked, each new prospect receives your org's standard welcome email with their login info.
Set the options, review the list of attendees to be promoted, then click Create Prospect Accounts. The system creates a member record for each checked row and links the attendee to it. After creation, those attendees flip from Unmatched to Matched and disappear from this tab.
Recommended workflow
For most events, the fastest path through the tool is:
- Open Suggested Matches first. Quickly scan the suggested matches, uncheck any obvious mismatches (common names where the system guessed wrong), then click Accept Selected Matches. Most of your unmatched count clears in one click.
- Switch to All Attendees and individually handle any attendees the suggester wasn't confident about. Use the drawer's member picker to find the right person manually.
- Finish in Create Prospects. Whatever's left is genuinely new to your system. Set the prospect type, decide on credentials and welcome email, and bulk-create the rest.
This usually takes a few minutes for a 200-person event, depending on data quality. Events where attendees registered with their org email and full name match member records cleanly — events where attendees used personal emails or nicknames take longer.
Tips and patterns
- Run Member Match after registration closes, not before. Doing it before the deadline means coming back to handle late registrants. Wait until your final attendee list is locked in, then run the tool once.
- Be cautious with name-only suggestions. Email matches are reliable; name matches are not. "John Smith" might be three different people. When the confidence is only based on name, open the drawer and look at the email and member type before accepting.
- Welcome emails go out immediately. If you check Send welcome email on bulk prospect creation, every new prospect gets the welcome email right away. Make sure that's what you want before clicking — it can't be unsent.