
New Title
Most settings here are checkboxes or short text fields, and almost everything autosaves the moment you change it — you'll see a small "Saving..." pill in the bottom-right confirm. The search box at the top filters across all section cards in real time; type any setting name and irrelevant cards collapse out of view.
What's in each section
- Common Options. The settings most events touch — use discount codes, allow attendees to return and edit, force descriptions to show, enable file uploads, and other broadly-used toggles.
- Emails & Notifications. Confirmation email behavior (who gets it, what it says), admin alerts when new registrations come in, from-address overrides.
- Projects & Communities. Auto-link registrants to Communities or Projects based on the packages or fields they pick.
- Miscellaneous Options. A grab-bag of behavior toggles — preview mode, registration groups, sign-in agreements, certificate awards, and more.
- Access Restrictions. Lock the form down by membership status — Members Only Registration, Make Event Invitation Only, restrict to specific member types, board members only.
- Cross-Reference & Prospects. How registrations flow back into Member or Prospect records — matching, merging, and follow-up automation.
- Invoice and Payment Options. Payment methods accepted, partial-payment behavior, late fees, pay-by-check details, accounting overrides.
Favorites
Next to every setting on the Advanced Options tab is a small heart icon. Click it to favorite that setting. Favorited settings get pinned to a Favorites block at the top of the General Information tab on every event, so the handful you tweak most are always one click away instead of buried in Advanced Options.
The recommended workflow:
- Use Advanced Options for the initial event setup — visit every section card, configure the settings that matter for the event.
- Favorite the handful of settings you find yourself changing most often (e.g. the registration cutoff date, the confirmation email subject, capacity warnings).
- For subsequent edits, work from the Favorites block on the General Information tab without opening Advanced Options at all.
Favorites are saved per-organization and apply to every event your organization runs. Each user manages their own list independently.
Organization-wide configuration
The global Event Registration configuration page lives at Configuration > Event Registration in the main MemberLeap menu (the exact menu path depends on your organization's permission structure). Settings here apply across every event in your organization and act as defaults for new events you create.
You can also reach the global config from the breadcrumb action bar on most event-registration pages by clicking the Config icon (gear).
get started
Membership Management
Advertising network
Waitlist
Last Update : August 2026
The waitlist feature lets you keep accepting registrations after an event reaches its capacity. Instead of slamming the door shut once you hit the attendee limit, MemberLeap rolls additional registrants onto a waitlist where they sit until a seat opens up. You can either move waitlisted people onto the main attendee list manually as cancellations come in, or have the system do it automatically.
Waitlists are particularly useful for events with hard physical capacity (a banquet hall that seats 200, a workshop room with 30 chairs) where you know cancellations will happen and you want to maximize attendance without overbooking.
Turning on the waitlist
The waitlist is enabled per event on the General tab of the event configuration editor. The relevant settings live under Capacity & Waitlist:
- Attendee Limit for Event — the cap that triggers the waitlist. Set this first. When total registrations equal this number, the event is considered full.
- Enable Waitlist When Event Reaches Capacity — the master switch. Check this to enable waitlist behavior. Without it, the event simply closes when the cap is reached and no further registrations are accepted.
- Automatically Move Waitlist Attendees to Main List As Spots Open Up — if checked, the system promotes the next waitlisted person to the main list whenever an active attendee cancels or is voided. Promotion happens in waitlist join order (first to join the waitlist is first to get promoted).
- Waitlist Landing Page Custom Verbiage — the message that appears on the public registration page when the event is full but the waitlist is open. Use this to set expectations (e.g. "We're at capacity. Add yourself to the waitlist and we'll contact you if a seat becomes available.").
The waitlist settings only show after you've checked the Enable Waitlist box — they slide down beneath it.
How registration works with a waitlist
When a member visits the registration page:
- If the event is below capacity, registration proceeds normally and they go on the active attendee list.
- If the event has hit capacity, the public page shows your custom waitlist verbiage and the registration form switches into waitlist mode. The member can still complete registration, but their record is created with status 'W' (waitlisted) instead of 'A' (active). No payment is collected at this stage — waitlisted registrants are not billed or charged until they're promoted off the waitlist to active status.
- If the waitlist is not enabled and the event is full, the public page shows a generic "registration closed" message and no further registrations are accepted.
Waitlisted attendees do not count against the attendee cap. The cap measures only active attendees. You can have 200 active and 50 waitlisted simultaneously.
Managing the waitlist
The waitlist management page is reached from the Event Hub via the Waitlist card in the Attendees section. This card only appears when the waitlist is enabled on the event.
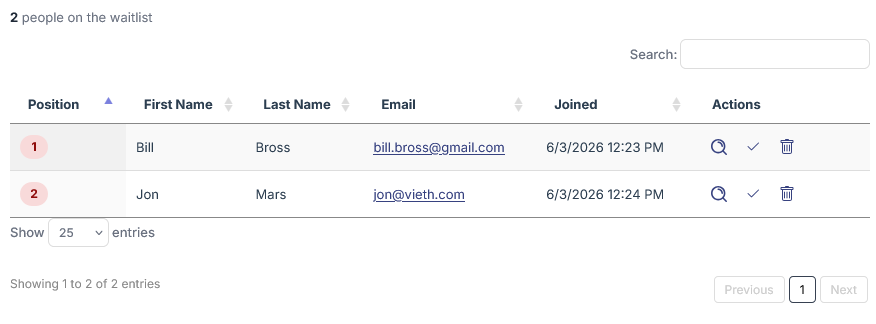
The page shows a count of how many people are on the waitlist, followed by a table listing each waitlisted person with their name, email, position number (1 is the first to join), join date, and action icons. Position numbers reflect the date each person joined the waitlist, so they line up with first-come-first-served fairness.
Make Active
The green checkmark icon on each row promotes that person off the waitlist and onto the active attendee list. This is the manual version of what auto-move does automatically. Clicking it opens a confirmation modal explaining what's about to happen: their registration and invoice are made active, and a confirmation email is sent.
Use Make Active when:
- You're running with auto-move off and a spot has opened up.
- You want to skip a waitlist position (someone further down the list pays sooner, has a sponsor connection, etc.) — though be aware this breaks first-come-first-served fairness.
- You're manually growing the event past its original cap because more space became available.
Void Attendee
The red trash icon voids a waitlisted attendee — removes them from the waitlist entirely. Use this when someone has asked to be taken off the waitlist or has otherwise dropped out before being promoted. A confirmation modal asks for confirmation before voiding.
Automatic promotion
When auto-move is enabled, the system watches for active attendee cancellations. As soon as an active attendee is voided or otherwise removed (refund processed, registration deleted, etc.), the system:
- Identifies the longest-waiting person on the waitlist (lowest position number).
- Promotes them to active status.
- Activates their invoice if they had one.
- Sends them a confirmation email letting them know they're now registered.
This happens automatically and without admin intervention. The waitlisted person finds out via email; the admin sees the change reflected on the next page refresh.
The waitlisted person's experience
Once on the waitlist, the registrant can:
- Receive a confirmation email letting them know they've been added to the waitlist (rather than the regular registration confirmation).
- See their waitlist status if they log into the attendee portal (Section: Event Attendee Portal).
- Be promoted to active either manually by an admin or automatically by the system.
No payment is collected while a registrant is waitlisted. The invoice (if any) is generated but not billed until they're promoted to active status. This means voiding a waitlisted registrant is clean — there's no payment to refund — and promoted registrants pay through the normal billing flow once they're active.
Tips and patterns
- Auto-move is usually the right choice. Unless you have a specific reason to gate promotions through an admin (sponsor priority, manual review, etc.), let the system handle promotions automatically. It's faster for the registrant and less work for you.
- Set the verbiage clearly. The default landing page text is generic. A custom message that explains how long the waitlist typically takes to clear, or what the chances of promotion are, sets realistic expectations.
- The waitlist is per-event, not per-package. If you have multiple packages and one is sold out but others have space, the registration form still routes the registrant into whichever package they pick. The waitlist only kicks in when the overall attendee cap is hit. For per-package limits, use package max limits on the Packages tab instead.
- Check the waitlist before launching reminders. If you send a "see you at the event" reminder, waitlisted attendees who haven't been promoted will be confused. Filter reminders to active status (the default) or coordinate with the waitlist state before pressing send.
- Auto-move doesn't fire on cap increases. If you raise the attendee cap from 200 to 250 mid-event, the waitlist won't automatically promote 50 people. You'll need to use Make Active on each one (or temporarily turn off the waitlist to let registration reopen, depending on your goal).