
New Title
Most settings here are checkboxes or short text fields, and almost everything autosaves the moment you change it — you'll see a small "Saving..." pill in the bottom-right confirm. The search box at the top filters across all section cards in real time; type any setting name and irrelevant cards collapse out of view.
What's in each section
- Common Options. The settings most events touch — use discount codes, allow attendees to return and edit, force descriptions to show, enable file uploads, and other broadly-used toggles.
- Emails & Notifications. Confirmation email behavior (who gets it, what it says), admin alerts when new registrations come in, from-address overrides.
- Projects & Communities. Auto-link registrants to Communities or Projects based on the packages or fields they pick.
- Miscellaneous Options. A grab-bag of behavior toggles — preview mode, registration groups, sign-in agreements, certificate awards, and more.
- Access Restrictions. Lock the form down by membership status — Members Only Registration, Make Event Invitation Only, restrict to specific member types, board members only.
- Cross-Reference & Prospects. How registrations flow back into Member or Prospect records — matching, merging, and follow-up automation.
- Invoice and Payment Options. Payment methods accepted, partial-payment behavior, late fees, pay-by-check details, accounting overrides.
Favorites
Next to every setting on the Advanced Options tab is a small heart icon. Click it to favorite that setting. Favorited settings get pinned to a Favorites block at the top of the General Information tab on every event, so the handful you tweak most are always one click away instead of buried in Advanced Options.
The recommended workflow:
- Use Advanced Options for the initial event setup — visit every section card, configure the settings that matter for the event.
- Favorite the handful of settings you find yourself changing most often (e.g. the registration cutoff date, the confirmation email subject, capacity warnings).
- For subsequent edits, work from the Favorites block on the General Information tab without opening Advanced Options at all.
Favorites are saved per-organization and apply to every event your organization runs. Each user manages their own list independently.
Organization-wide configuration
The global Event Registration configuration page lives at Configuration > Event Registration in the main MemberLeap menu (the exact menu path depends on your organization's permission structure). Settings here apply across every event in your organization and act as defaults for new events you create.
You can also reach the global config from the breadcrumb action bar on most event-registration pages by clicking the Config icon (gear).
get started
Membership Management
Advertising network
Event Hub
Last Update : August 2026
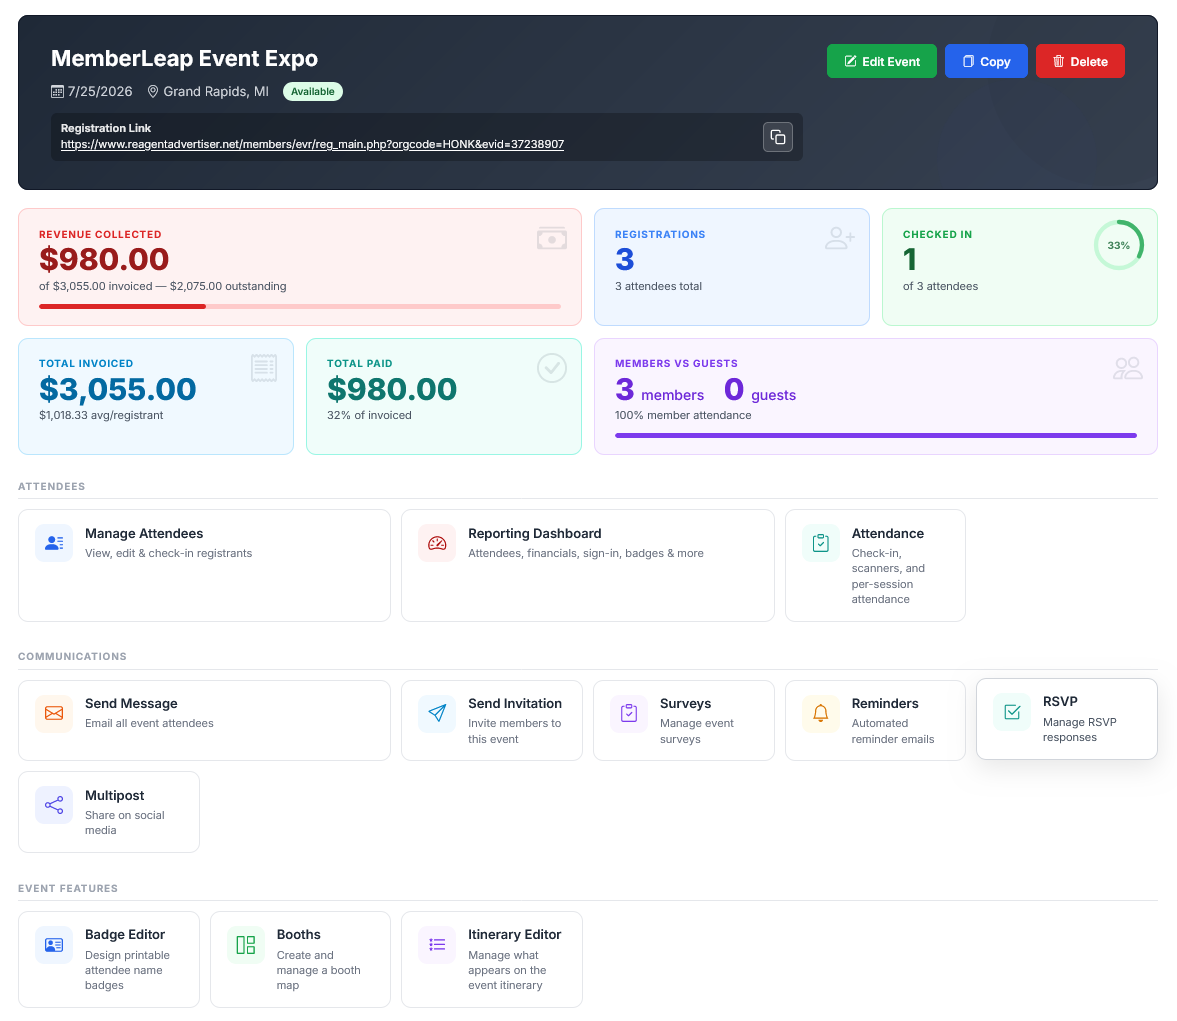
The Event Hub is the landing page for every event in MemberLeap. Clicking any event from the Event List, or coming back to an event you were working on, drops you on the Hub. It pulls together the event's at-a-glance numbers, the public registration link, and every tool that operates on that event into a single dashboard.
The Hub adapts to what the event actually uses. Cards for Surveys, RSVP, Booths, Waitlist, Sessions, Invitee List, Stages, and others only appear when the corresponding feature is enabled on the event or available to the current user. A simple event with no features turned on will show a much shorter set of tiles than a multi-day conference with the full suite. Whatever you see on the Hub is what's actually configured.
The event header
The top of the page identifies the event. It shows the event name, dates, location, current availability status (Available, Disabled, Closed, Hidden, etc.), an Invite-Only badge if applicable, and a capacity counter when an attendee cap is set. Admins also see Edit Event, Copy, and Delete buttons on the right side of the header — Edit Event takes you straight into the configuration editor, Copy clones the event as a starting point for a new one, and Delete removes it (with confirmation).
Below the event metadata, the Hub displays the Registration Link — the public URL you give to people to sign up for the event. A Copy button next to it puts the link on your clipboard for pasting into emails, social media, or your website. This is usually the first thing you grab after creating a new event.
The stats grid
Below the header is a row of stat tiles that update in real time as registrations come in:
- Revenue Collected — total dollars actually paid for this event, with a progress bar showing what percentage of invoiced amounts have been collected and how much is still outstanding.
- Registrations — how many people have registered (contact count), with the total attendee count underneath (contacts can bring guests, so attendees may be higher).
- Checked In — a donut ring showing the percentage of attendees who have been marked as attended, with the raw count below it.
- Total Invoiced — total amount billed for the event, with an average-per-registrant calculation below.
- Total Paid — same as Revenue Collected but framed as a percentage of total invoiced. Useful for spotting events with collection problems.
- Members vs Guests — split between member registrations and non-member registrations, with a visual bar showing the ratio.
The stats give you an instant read on event health. If revenue collected is much lower than total invoiced, you have outstanding balances to chase. If check-in percentage is low and the event has already happened, attendance was lower than registrations suggested.
Tool sections
Below the stats, the Hub organizes every tool that operates on the event into themed sections. Each tool is a card with an icon, a name, and a short description. Click a card to open that tool.
Attendees
The core registration-management tools.
- Manage Attendees — opens the full attendee list (Section: Editing Attendees and Payments). The main workspace for adding, editing, and checking in registrants.
- Reporting Dashboard — opens the report menu with everything from financial summaries to name badges to attendee exports (Section: Event Reporting).
- Waitlist — only shown when the event has a capacity limit and the waitlist is enabled. Opens the list of registrants currently on the waitlist.
- Manage Invitee List — only shown for invite-only events. Manages who has been invited and tracks invitation responses.
- Attendance — opens the attendance hub for check-in, scanners, and per-session attendance tracking (Section: Attendance Tracking By Field).
- Sessions — only shown for orgs that use the sessions feature. Manages multi-track session schedules.
Communications
Tools for reaching attendees and prospects.
- Send Message — email blast to attendees with the events messages tool (Section: Event Registration Messages).
- Send Invitation — opens the invitation tool for sending event invites to members. Used for both invite-only events and general promotion. See Section: Manage Invitee List for details.
- Surveys — pre- and post-event surveys (Section: Surveys).
- Reminders — automated reminder emails sent on schedules tied to the event date (Section: Reminders).
- RSVP — only shown when RSVP is enabled on the event. Manages RSVP responses gathered before registration (Section: RSVP).
Event Features
Builder tools for the parts of the event that attendees see.
- Portal Builder — build the attendee self-service portal: pick and arrange the feature tiles and content tabs attendees see (Section: Event Attendee Portal).
- Badge Editor — design printable name badges (Section: Badge Builder).
- Booths — create and manage a booth floor plan (Section: Booth Editor).
- Itinerary Editor — build the event agenda and control its public event-page link; the portal itinerary tiles are set in the Portal Builder (Section: Itinerary Builder).
Admin Tools
Less-frequently-used administrative actions.
- Event Admins — assign member-level event admins who can manage this specific event without needing global EVR permissions (Section: Partial Admin Access).
- Task List — only shown when tasks are enabled. Manages the event's punch list (Section: Tasks).
- Audit Log — full change history for the event and its registrations (Section: Auditing).
Common workflows
The Hub is designed around a few core patterns:
- Setting up a new event: after creation, you'll typically hit Edit Event from the header to finish configuration, then come back to grab the registration link and share it.
- During registration: watch the stats grid for revenue and registration counts, use Send Message or Reminders to drive sign-ups, and use Manage Attendees to handle edits and special requests.
- Event day: open Attendance to check people in, use Manage Attendees for last-minute changes, and use Reporting Dashboard to print badges and sign-in sheets.
- After the event: run final reports from Reporting Dashboard, send a thank-you message, and launch a post-event survey.
Permission-based visibility
The Hub respects the same permission rules as the rest of EVR. Members assigned as event admins for this specific event see only the cards their permissions allow — typically Manage Attendees, Reporting Dashboard, Attendance, and Communications — but not Edit Event, Audit Log, or the Admin Tools section. Limited EVR users (sec_evr_limit) similarly see a reduced set. See Section: Partial Admin Access for details on per-event admin assignment.
Tips
- Use the Copy Link button. The registration link is the single most important URL for an event. The Copy button avoids the temptation to retype or hand-edit it.
- The Hub is read-only for stats. Stats refresh on each page load. If you want a live count during an event, just refresh the page rather than leaving it open.