
New Title
Most settings here are checkboxes or short text fields, and almost everything autosaves the moment you change it — you'll see a small "Saving..." pill in the bottom-right confirm. The search box at the top filters across all section cards in real time; type any setting name and irrelevant cards collapse out of view.
What's in each section
- Common Options. The settings most events touch — use discount codes, allow attendees to return and edit, force descriptions to show, enable file uploads, and other broadly-used toggles.
- Emails & Notifications. Confirmation email behavior (who gets it, what it says), admin alerts when new registrations come in, from-address overrides.
- Projects & Communities. Auto-link registrants to Communities or Projects based on the packages or fields they pick.
- Miscellaneous Options. A grab-bag of behavior toggles — preview mode, registration groups, sign-in agreements, certificate awards, and more.
- Access Restrictions. Lock the form down by membership status — Members Only Registration, Make Event Invitation Only, restrict to specific member types, board members only.
- Cross-Reference & Prospects. How registrations flow back into Member or Prospect records — matching, merging, and follow-up automation.
- Invoice and Payment Options. Payment methods accepted, partial-payment behavior, late fees, pay-by-check details, accounting overrides.
Favorites
Next to every setting on the Advanced Options tab is a small heart icon. Click it to favorite that setting. Favorited settings get pinned to a Favorites block at the top of the General Information tab on every event, so the handful you tweak most are always one click away instead of buried in Advanced Options.
The recommended workflow:
- Use Advanced Options for the initial event setup — visit every section card, configure the settings that matter for the event.
- Favorite the handful of settings you find yourself changing most often (e.g. the registration cutoff date, the confirmation email subject, capacity warnings).
- For subsequent edits, work from the Favorites block on the General Information tab without opening Advanced Options at all.
Favorites are saved per-organization and apply to every event your organization runs. Each user manages their own list independently.
Organization-wide configuration
The global Event Registration configuration page lives at Configuration > Event Registration in the main MemberLeap menu (the exact menu path depends on your organization's permission structure). Settings here apply across every event in your organization and act as defaults for new events you create.
You can also reach the global config from the breadcrumb action bar on most event-registration pages by clicking the Config icon (gear).
get started
Membership Management
Advertising network
Event Registration Surveys
Last Update : August 2026
The Surveys feature lets you send post-event (or pre-event) surveys to attendees and collect their responses. Each survey is its own questionnaire with whatever questions you want to ask, and the system handles delivering the link, tracking who responded, and aggregating the results. Use surveys for satisfaction feedback, session ratings, hotel preferences, dietary follow-ups, post-event testimonials, or anything else you want to ask attendees outside the registration form itself.
This article walks through creating a survey, building its questions, sending it to attendees, and reviewing responses.
Getting to Surveys
From the event list, click the Event Hub link on an event's card, then click Surveys from the Communications section of the hub.
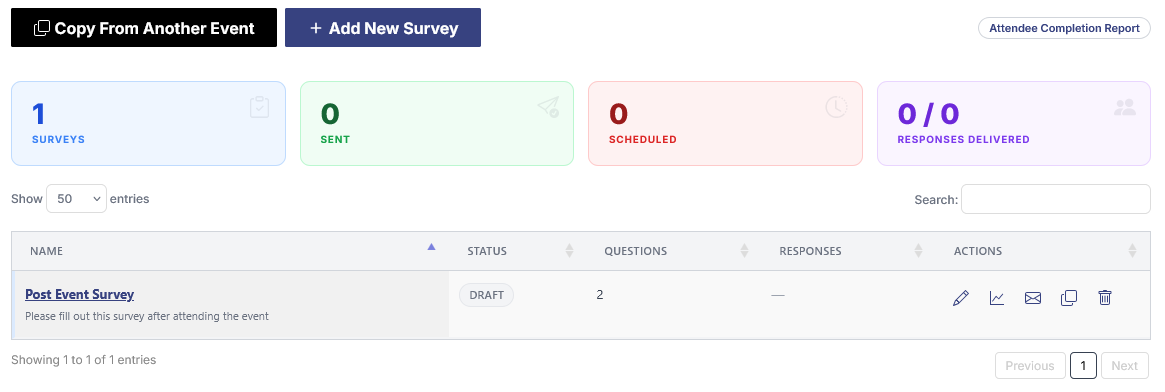
The Surveys list
The main Surveys page shows every survey you've created for the event. The top of the page has the action buttons and a metrics bar.
- Add New Survey. Creates a new survey and opens the survey editor.
- Copy From Another Event. Picker that copies a survey (including all its questions) from another event into this one. Useful when you reuse the same satisfaction questionnaire year after year.
- Attendee Completion Report (right side). Pulls a cross-survey report showing which attendees have completed which surveys, so you can identify who still needs to respond.
The metrics bar shows totals for the event: Surveys (total created), Sent, Scheduled, and Responses Delivered (a count with a progress bar showing what percentage of the sent invitations have actually been completed).
Each survey row in the table shows the survey name, current status, and action icons:
- Edit. Opens the survey editor.
- Reports. Opens the response reports for this survey — aggregated answers, per-attendee responses, exports.
- Email. Opens the email composer for sending (or scheduling) the survey invitation to attendees.
- Copy. Duplicates the survey within the same event.
- Delete. Removes the survey from the event with a confirmation prompt.
Creating a survey
Click Add New Survey. The survey editor opens with three tabs in the sidebar that walk through the lifecycle.
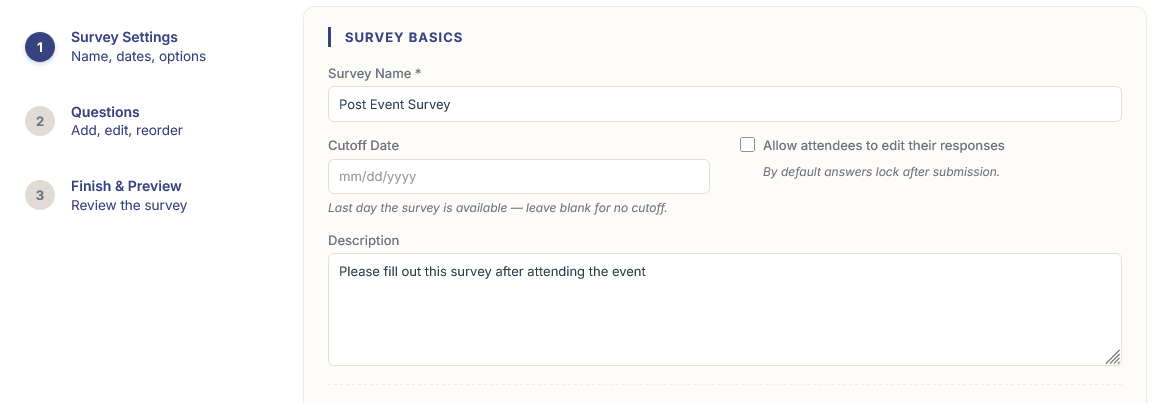
Survey Settings
The first tab covers the basics:
- Survey name. Internal name that admins see in the survey list. Not shown to respondents (respondents see the email subject and a heading you can customize separately).
- Survey description. Optional intro shown at the top of the survey when an attendee opens it.
- Availability window. Optional date range for when the survey accepts responses. After the cutoff, anyone clicking the survey link sees a "closed" message instead of the questions.
- Other behavior options. Show a thank-you page after submission, allow multiple responses per attendee or limit to one, and any org-specific options enabled on your account.
Questions
The second tab is where you build the questionnaire itself. The workflow mirrors the Custom Fields tab on the event editor — click Add New Field, pick a field type, and configure the field.
Available question types match the event-side custom fields:
- Text Field. Single-line free-text response.
- Selection. Drop-down or radio buttons where the respondent picks one option from a predefined list.
- Checkbox. Single on/off response, or use multiple checkbox questions side-by-side when you want "pick any that apply" behavior.
- Multiline Text. Longer free-text response for open-ended questions.
- Numeric. Numeric input. Useful for ratings on a defined scale.
- Text Caption. A static heading or instructions block between questions. Doesn't collect a response — use it to break up long surveys into logical sections.
Drag the handle on the left of each question to reorder them. Selection questions can have multiple options managed in a separate editor (click the Options icon on the question row). Required questions force a response before the survey can be submitted; optional questions can be left blank.
Finish & Preview
The last tab shows a live preview of the survey as respondents will see it. Use this to verify the questions are in the right order, the formatting reads cleanly, and the conditional logic (dependent questions on checkboxes) works the way you expect.
You can come back to the editor anytime, even after a survey has been sent. Edits affect the questionnaire going forward but don't change responses you've already received.
Sending a survey to attendees
Creating the survey doesn't automatically notify attendees — that's a separate step. From the survey list, click the Email action icon on any survey's row. The email composer opens with the survey link merged in, ready to send to attendees.
The composer works much like the event Messages composer:
- Edit the subject, body, and from-address.
- Pick recipients — all event attendees, only attendees on specific packages, only attendees who picked specific custom-field options, or a manual list of addresses.
- Send immediately or schedule for a future date.
Each recipient's link is unique to them, which means the survey automatically tracks which attendee submitted which response without requiring them to type their name or email manually. Responses are tied to attendee records in the database.
You can send the same survey to attendees multiple times if needed (reminder emails for non-responders, for example) — the system tracks who's completed and lets you target only non-responders on follow-up sends.
Reviewing responses
The Reports action icon on a survey row opens the response reports. Available views:
- Aggregated answers. For each question, see the distribution of responses — a bar chart for selection / checkbox questions, an average for numeric, and a list of all answers for text questions.
- Per-attendee responses. See every response in full, attendee by attendee.
- Exports. Download all responses as CSV for further analysis in a spreadsheet.
The cross-survey Attendee Completion Report (linked from the top of the surveys list) shows which attendees have completed each survey on the event. Use it for chasing non-responders or measuring overall response rates.
Tips and gotchas
- Keep surveys short. Response rates drop sharply once a survey passes about 10 questions. If you have more to ask, consider splitting into multiple surveys (one immediate post-event, one a week later) instead of one long form.
- Test with yourself first. Send the survey to a manual list containing just your own email before sending to attendees. Submit a test response, look at the report, verify the questions and responses display the way you expect.
- Schedule the send for the event window. Send the survey when attendees are most likely to respond — usually within a day or two after the event, while the experience is fresh.
- Link surveys from other places too. The survey link is portable. You can include it in a confirmation email, post it to your event page, or send it through other channels in addition to the built-in email composer.