
New Title
Most settings here are checkboxes or short text fields, and almost everything autosaves the moment you change it — you'll see a small "Saving..." pill in the bottom-right confirm. The search box at the top filters across all section cards in real time; type any setting name and irrelevant cards collapse out of view.
What's in each section
- Common Options. The settings most events touch — use discount codes, allow attendees to return and edit, force descriptions to show, enable file uploads, and other broadly-used toggles.
- Emails & Notifications. Confirmation email behavior (who gets it, what it says), admin alerts when new registrations come in, from-address overrides.
- Projects & Communities. Auto-link registrants to Communities or Projects based on the packages or fields they pick.
- Miscellaneous Options. A grab-bag of behavior toggles — preview mode, registration groups, sign-in agreements, certificate awards, and more.
- Access Restrictions. Lock the form down by membership status — Members Only Registration, Make Event Invitation Only, restrict to specific member types, board members only.
- Cross-Reference & Prospects. How registrations flow back into Member or Prospect records — matching, merging, and follow-up automation.
- Invoice and Payment Options. Payment methods accepted, partial-payment behavior, late fees, pay-by-check details, accounting overrides.
Favorites
Next to every setting on the Advanced Options tab is a small heart icon. Click it to favorite that setting. Favorited settings get pinned to a Favorites block at the top of the General Information tab on every event, so the handful you tweak most are always one click away instead of buried in Advanced Options.
The recommended workflow:
- Use Advanced Options for the initial event setup — visit every section card, configure the settings that matter for the event.
- Favorite the handful of settings you find yourself changing most often (e.g. the registration cutoff date, the confirmation email subject, capacity warnings).
- For subsequent edits, work from the Favorites block on the General Information tab without opening Advanced Options at all.
Favorites are saved per-organization and apply to every event your organization runs. Each user manages their own list independently.
Organization-wide configuration
The global Event Registration configuration page lives at Configuration > Event Registration in the main MemberLeap menu (the exact menu path depends on your organization's permission structure). Settings here apply across every event in your organization and act as defaults for new events you create.
You can also reach the global config from the breadcrumb action bar on most event-registration pages by clicking the Config icon (gear).
get started
Membership Management
Advertising network
Bulk Attendee Uploader
Last Update : August 2026
The Bulk Attendee Upload tool lets you import a whole roster of attendees into an event from a spreadsheet in one pass, instead of adding each person by hand. It's built for the situations where your attendee data already lives somewhere else — a registration you collected on paper or through another system, a past event you're bringing into MemberLeap, or a list a chapter or partner sent you. Point it at a CSV or Excel file, tell it which spreadsheet column means what, and it creates the contact, attendee, and invoice records for every row.
The tool walks you through three clearly-numbered steps —
Map columns,
Review, and
Process — and it never commits anything to your event until you reach the final step and confirm. Everything up to that point is just preparation you can revise freely.
Getting there
Open the event's attendee list and click the Bulk Attendee Upload button (next to Attendance Tools), or reach it from the Event Hub. You land on the upload list — a running history of every spreadsheet you've uploaded for this event, each showing its status: Not yet processed, Queued for processing, Processed on {date}, or Processing failed. From here you start a new upload, or click back into one you haven't processed yet to keep working on it.
Step 1: Upload your file
Start a new upload and choose your file. The tool accepts .csv and .xlsx (modern Excel) files — an Excel workbook is converted automatically, reading the first worksheet. Older .xls files aren't supported; open them in Excel and Save As .xlsx or .csv first.
Your spreadsheet should have a header row (the first row naming each column) and one attendee per row after that. At minimum you need a first name and last name column; everything else is optional. Don't worry about column order or naming them a particular way — you'll map them in the next step.
Step 2: Map your columns
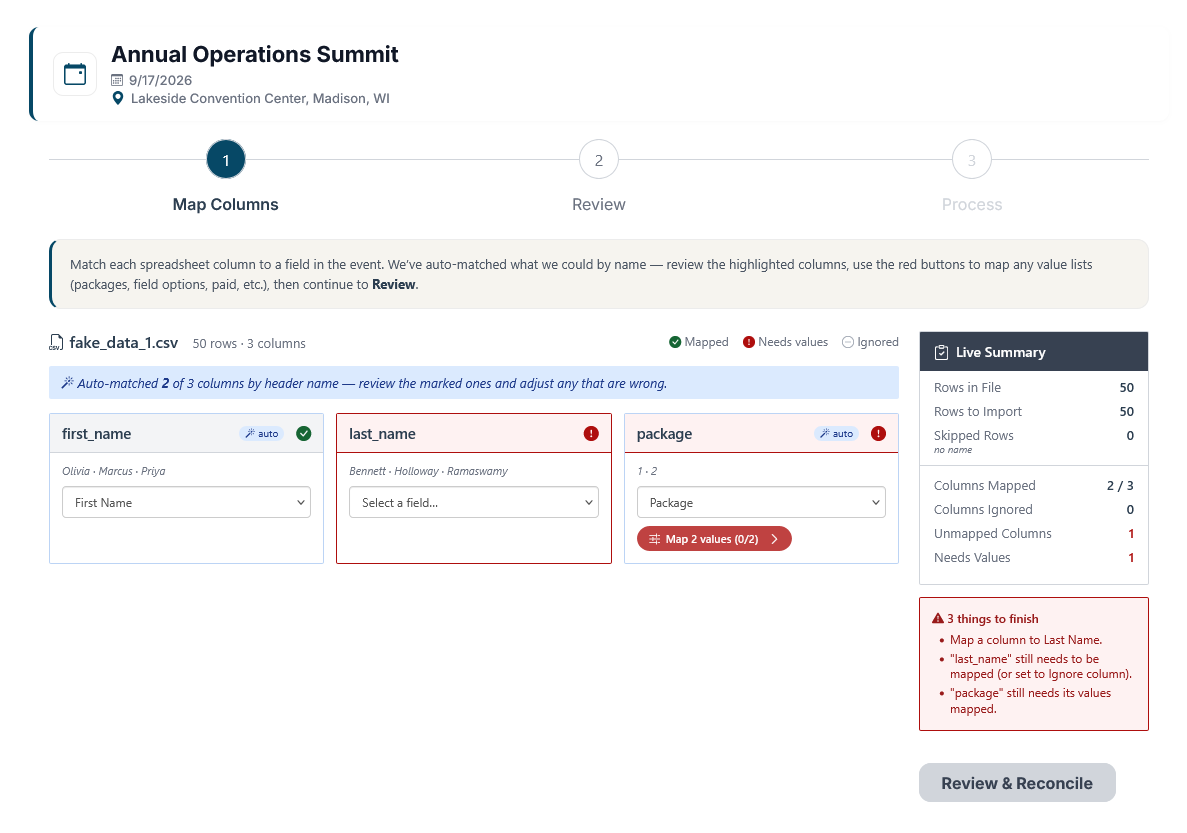
The tool shows one card per column in your spreadsheet, each with a sample of the values it found and a dropdown where you choose what that column represents — First Name, Email, Organization, a package, a payment field, one of your event's custom fields, and so on. It takes a first guess at each column based on its header name (a column called "E-mail Address" auto-matches to Email) and flags its guesses so you can confirm or change them.
- Auto-matched columns are tagged so you can glance and confirm. Always double-check them — a wrong guess is easy to miss.
- Ignore Column tells the tool to skip a column entirely. Use it for anything in your spreadsheet you don't want imported.
- Create new lets you build a brand-new custom field (or package) on the spot — with its price where relevant — if your spreadsheet has data your event doesn't have a home for yet.
- Each field can only be mapped once. Once a column claims, say, Email, that option drops out of the other columns' dropdowns, and reappears the moment you release it.
Step 3: Map your values
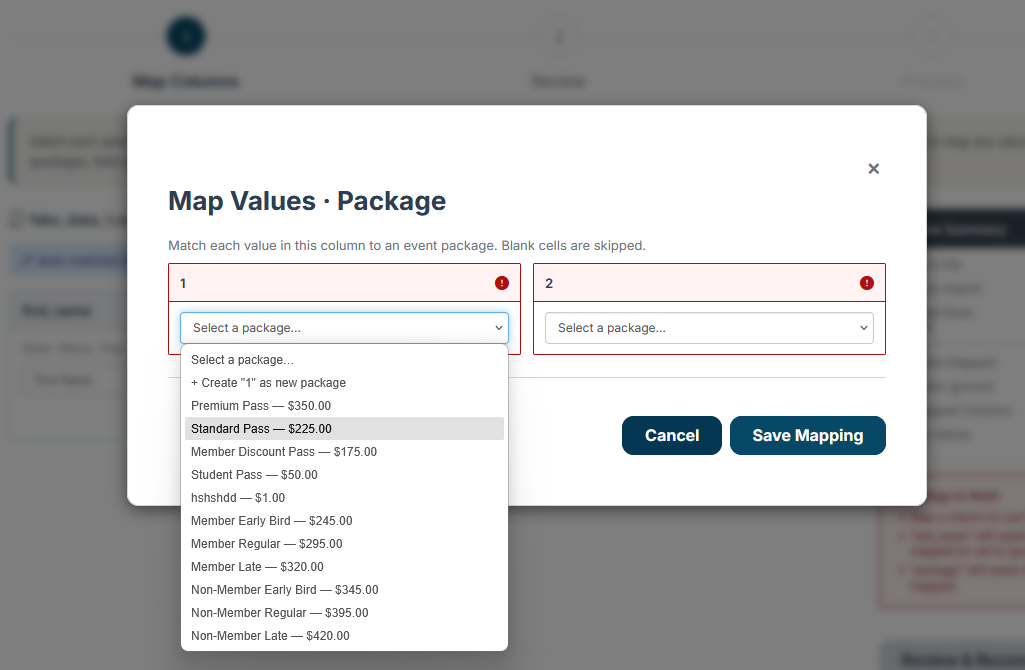
Column mapping tells the tool what each column is; value mapping tells it what the individual values mean. Any column mapped to something with a fixed set of choices — a package, a selection field, a Yes/No field, a payment method, the Paid? and Attended columns — shows a small chip you click to open a mapping window. There you match each distinct value in your spreadsheet to the matching option in your event.
For example, if your "Registration Type" column contains "Full", "Student", and "Virtual", you map each of those to the corresponding event package. The tool matches values automatically where it can (an exact or near-exact name match), so often you just confirm. You can also create a new package or option — with its price — right from this window if a value doesn't exist in your event yet.
Step 4: Review
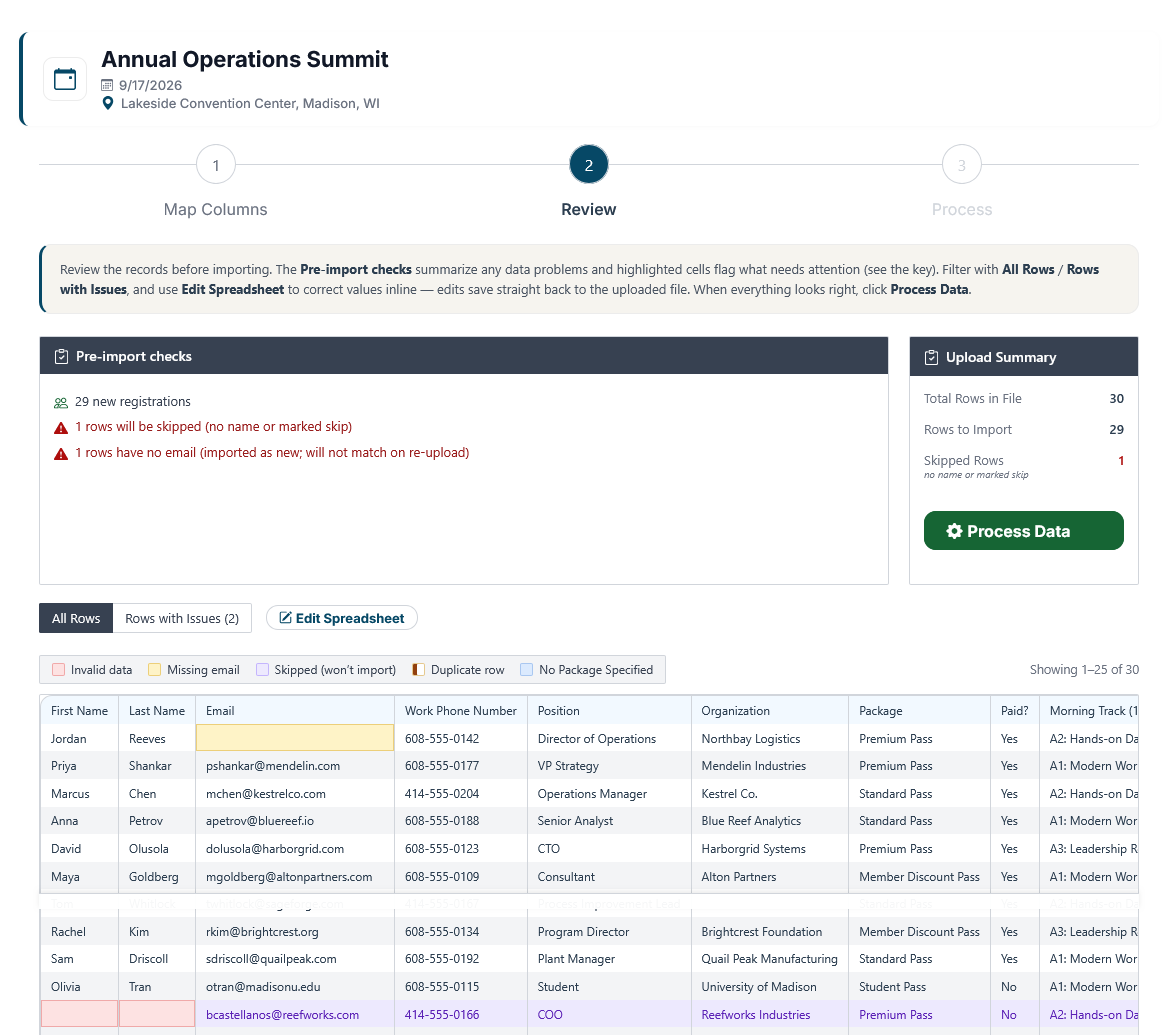
The Review step shows exactly what will be created, row by row, with a pre-import checks panel above the table that flags anything worth a look before you commit — rows with no name (which will be skipped), duplicate people within the file, missing or malformed email addresses, amounts that aren't valid numbers, and unrecognized dates. These are informational; most don't block the import, they just give you a chance to fix data first.
Two tools help you clean up without leaving the page:
- Edit spreadsheet — turn on edit mode and correct individual cells right in the preview. Plain text, number, and date columns become editable inputs; mapped columns (packages, payment methods, and the like) get a dropdown of the values already in your sheet.
- Skip a row — mark any specific row to exclude it from the import using the eye icon, without deleting it from your file.
Step 5: Process
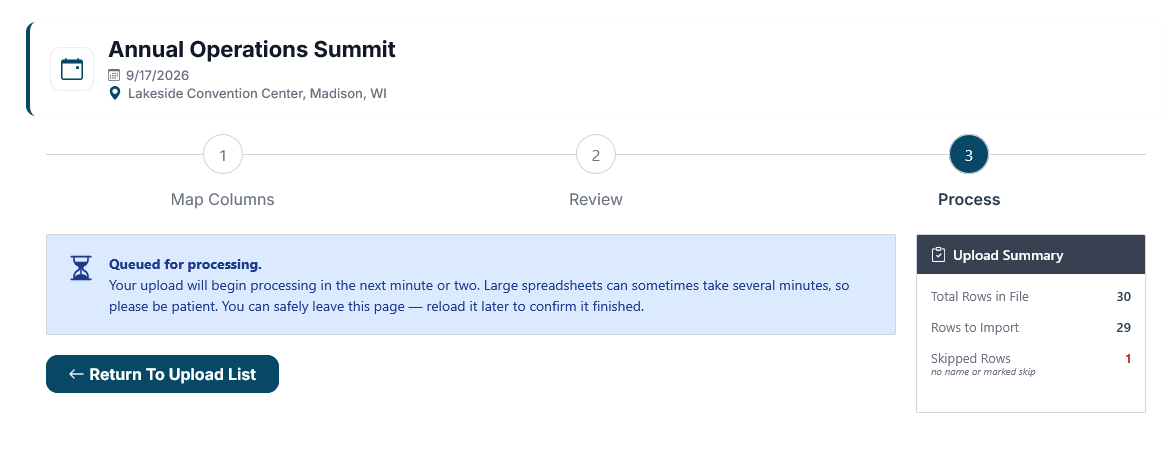
When you're satisfied, click Process Data and confirm. The tool queues your upload and processes it in the background — it does not run while you wait. Processing begins within a minute or two, and larger spreadsheets can take several minutes to finish. You'll see a "Queued for processing" message with a button to return to the upload list, so you can safely leave the page and come back later. When it's done the upload shows Processed on {date} and the new registrations appear in your attendee list.
Because processing runs in the background, an upload can only be processed once and can't be interrupted by closing your browser or navigating away — a big improvement for large files.
How amounts and invoices work
For each row, the tool builds an itemized invoice from the package and field costs, just like a normal registration. Three optional money columns let you control the financial side:
- Total — the amount the registrant owes. If you provide it, the tool reconciles the invoice to match that total — handy when you're importing past registrations whose totals you already know.
- Amount Paid — how much they've paid. This records a payment against the invoice and supports partial payments.
- Paid? — a simple yes/no. A "yes" with no Amount Paid records payment in full.
Together these let you import rows that are fully paid, partially paid, unpaid (a balance due), or comped ($0). A Payment Method column maps each row's method (Check, Credit Card, Purchase Order, and so on). Rows with nothing owed come in as no-charge registrations.
Members, duplicates, and matching
As it imports, the tool tries to link each attendee to an existing member record — by member number, email, or name — so imported attendees connect to their member accounts where possible. It also guards against duplicates: if two rows (or a row and someone already in the event) share the same name and email, they're treated as the same person and merged rather than creating a duplicate. Rows without an email are always brought in as new records, since there's no reliable way to know they're the same person.
If something goes wrong
If an upload can't be processed after a couple of automatic attempts, it's marked Processing failed on the list and on the Process step. A failed upload stays editable — review your mappings, fix any obvious data problems, and use Process Data to try again. If it keeps failing, contact support.
Undoing an import
A processed upload is locked so it can't be changed or accidentally re-run. If you need to undo one, an administrator can use the revert control on the upload list, which removes the registrations that upload created (along with their invoices and payments) and resets the upload so you can re-map and process it again. This is a powerful action — it's presented as irreversible and is limited to full administrators.
Tips and patterns
- Clean your spreadsheet first, but don't over-polish. The tool is forgiving — it normalizes states and countries to standard codes, strips currency symbols and commas from amounts, and falls back to the event date for blank or invalid registration dates. Fix the things that matter (names, emails, packages) and let the tool handle the rest.
- Use the Review checks as a to-do list. Every flag in the pre-import panel is a chance to catch a problem before it becomes a bad registration. Missing emails and duplicate rows are the most common things worth a second look.
- You can leave after you hit Process. Because processing runs in the background, there's no need to sit and wait. Queue it, go do something else, and check back — the status on the upload list tells you when it's done.
- Import once your list is final. Like most bulk operations, it's cleanest to import a settled roster rather than a moving target you'll have to reconcile later.
- Keep your source file. If an import doesn't come out the way you expected, the fastest path is often to revert (admin), fix the spreadsheet, and re-upload.