
get started
Membership Management
Advertising network
Attendance Certificates
Last Update : August 2026
The Attendance Certificate Builder is a visual editor for designing the certificates of attendance your registrants receive after an event. You drag elements onto a certificate layout — the attendee's name, the event name and dates, credits or contact hours earned, your logo, a signature image — and MemberLeap generates a print-ready PDF for each qualifying attendee, filling in each person's data automatically.
Certificates you design in the builder replace the older, hard-coded certificate for that event. You don't have to migrate everything at once: the builder only takes over an event once you've built at least one certificate for it (or set an organization-wide master). Until then, the event keeps producing whatever certificate it produced before. This is the adoption rule — more on it below.
Getting to the Certificate Builder
From the event list, click Event Hub on the event's card. In the Event Hub, click the Attendance Certificates card in the Event Features section. That opens the certificate landing page for this event.
The reporting side is separate: the Reporting Dashboard's Attendees section has a Print All Attendance Certificates export that generates a single ZIP of every qualifying attendee's certificate at once — use that when you want to print or archive the whole batch after an event.
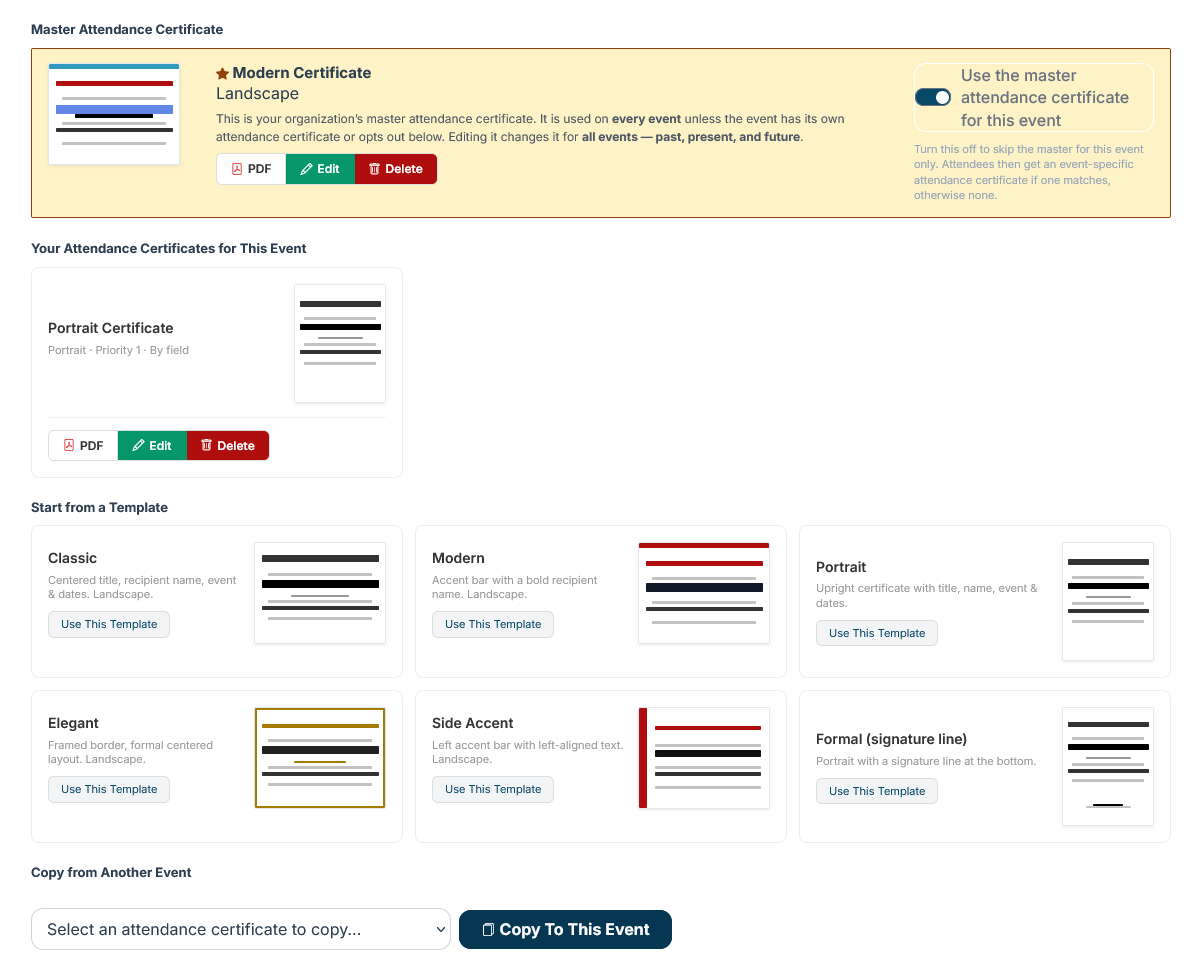
The certificate landing page
The landing page is organized into four sections.
Master Certificate
The top panel shows your organization's master certificate, if you have one. A master is a single certificate design that applies to every event in your organization automatically — past, present, and future — so you don't have to rebuild the same design event by event. You can have one master per organization.
When a master exists, this panel gives you edit / PDF / delete controls for it, plus a per-event opt-out toggle: switch it off to tell this one event to ignore the master (useful when a specific event needs a different certificate, or none at all).
Your Certificates for This Event
This section lists every certificate you've built specifically for this event. Each card shows the certificate's name, orientation, and audience, plus action buttons to generate its PDF, Edit it, or Delete it (with a confirmation prompt). If you haven't built any event-specific certificates yet, this section won't appear.
Start from a Template
Six pre-built starter layouts get you going without designing from scratch — Classic, Modern, Portrait, Elegant (framed gold border), Sidebar (left accent bar), and Formal (portrait with a signature line). Pick the closest one and customize from there; the starter lands you in the editor with elements already placed.
Copy from Another Event
If you've already built a certificate on a previous event, choose it from the Copy from Another Event dropdown to duplicate it onto the current event. The copy is yours to modify without touching the original.
The certificate editor
The editor splits into three areas: a settings toolbar on the left, the certificate canvas in the middle (a live, full-size preview of the certificate), and an element properties panel on the right that appears when you select an element.
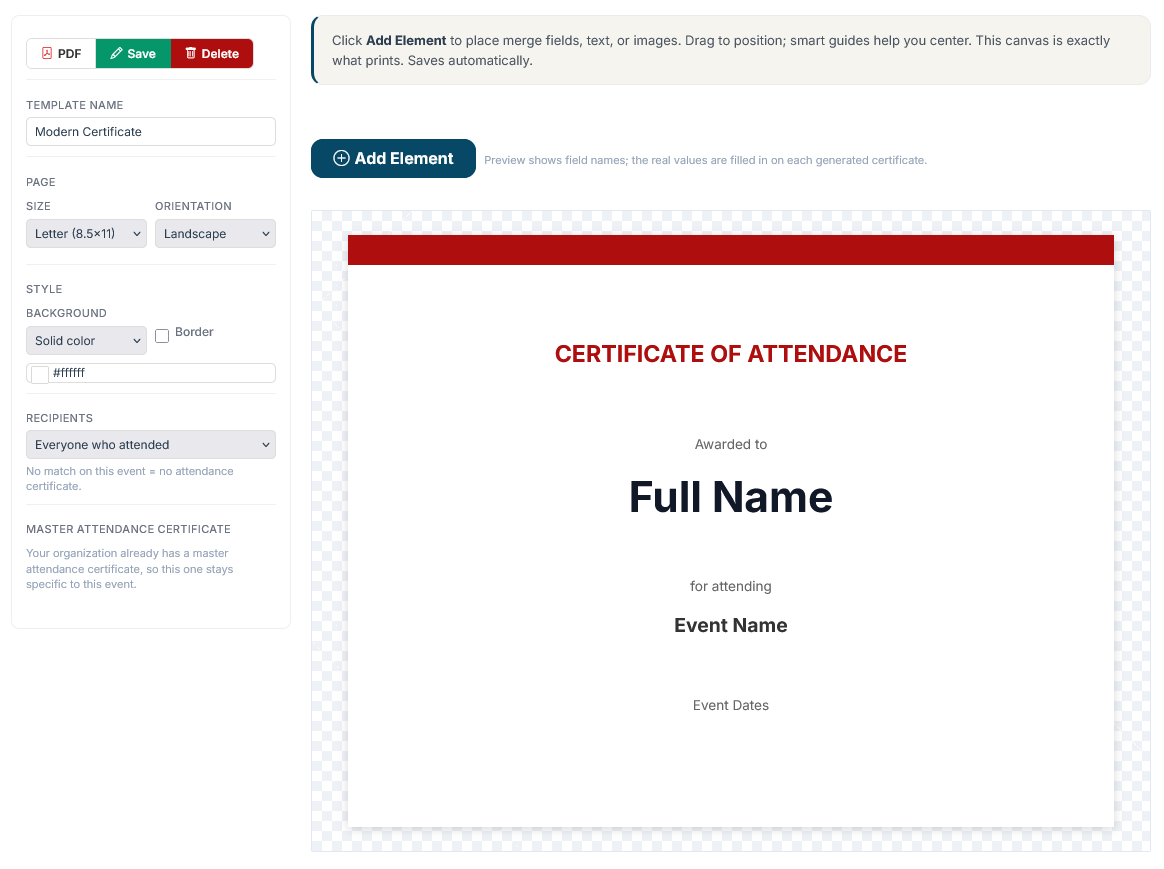
The settings toolbar
Top to bottom, the toolbar holds:
- Save / PDF / Delete buttons. The editor also autosaves as you work — a small "Saved" toast appears in the bottom-right corner after each change — but Save commits immediately, PDF generates a preview PDF, and Delete removes the certificate.
- Certificate Name. Internal name shown in the certificate list and at the top of the editor.
- Page. Letter (8.5×11), A4 (8.27×11.69), or Custom (you set width and height in inches), plus Orientation (Portrait or Landscape).
- Background. A solid background color, or an uploaded background image. When you upload an image you can set its scale and its horizontal / vertical position with sliders, so a full-bleed design or a watermark lines up exactly. A Remove link clears the image.
- Border. A checkbox draws a border around the certificate; when it's on you can set the border color, style (solid / dashed / dotted / double), width, corner radius, and an inset (the gap between the page edge and the border).
- Recipients. Controls who receives this certificate — see Audience targeting below.
- Priority. When an event has more than one certificate, a rank dropdown (1st, 2nd, 3rd…) sets the order they're checked in. Each attendee gets the first certificate whose audience they match.
- Make Master. Below the Recipients section, promotes this certificate to your organization's master (only when the org doesn't already have one).
The certificate canvas
The center area is a live, full-size preview. Because a certificate is one-per-page, what you see is exactly what each attendee's certificate will look like — the data fills in per attendee when the PDF is generated. The preview shows field names (for example "Full Name" or "Event Name") as placeholders; the real attendee data is substituted when the certificate is actually produced.
Above the canvas is the Add Element button. Click it to open a picker grouped by type:
- Attendee. Data pulled from each attendee's registration — First Name, Last Name, Full Name, Organization, Position, Email, City, State, Member Number, and so on.
- Event. Details about the event itself — Event Name, Date Range, Begin / End dates, Location, City, State.
- Certificate. Certificate-specific values — Certificate Number (the attendee's registration confirmation number), Date Issued (the date the certificate is generated), and License Number (the member's license/aux field, where your organization stores one).
- Credits. Any credits or contact hours the event awards — overall event credits and per-field CEU/contact hours — shown with your organization's own credit labels. Only the credit types your event actually uses appear here.
- Design. Layout elements that don't depend on attendee data — Custom Text (static text you type), Image (upload your own, e.g. a logo), Signature Image, Horizontal Line, Rectangle.
- Custom Fields. Any custom field on the event, so you can print session picks, credit categories, table numbers, or any other registration data.
After you place an element, drag it anywhere on the certificate. Elements snap to center as you drag. Click an element to select it and open its properties on the right.
The element properties panel
The properties panel adapts to the selected element:
- Text — the actual text content (for Custom Text elements).
- Font — a font-family dropdown (a curated set of embedded fonts so the browser preview matches the PDF exactly), Bold and Italic toggle buttons, and a text color picker, all on one line.
- Size — the font size for text, or the dimensions for images.
- Shape controls — for lines and rectangles, a color picker plus width and height sliders on one line.
All changes autosave; the "Saved" toast confirms each one.
Audience targeting — who receives a certificate
The Recipients setting decides which attendees a certificate applies to:
- Everyone. Every qualifying attendee on the event gets this certificate.
- By package. Only attendees registered under the package(s) you select.
- By field. Only attendees whose custom-field answers match the conditions you choose — for example "only people who selected the CE session" or "only attendees who checked the workshop box."
Combined with Priority, this lets one event issue different certificates to different groups: build a general certificate for everyone at 2nd priority and a CE-credit certificate targeted to the CE-session attendees at 1st, and each attendee automatically gets the right one.
An attendee who matches no certificate on an adopted event gets no certificate — the event does not silently fall back to the old certificate. If you want everyone covered, include an Everyone certificate as a catch-all.
The adoption rule — how the builder takes over
The builder never changes an event's certificates until you tell it to. The rule is simple:
- No builder certificates and no master? The event behaves exactly as it did before — the old certificate keeps working. Nothing changes.
- At least one builder certificate for the event, or an organization master? The builder now governs that event. Attendees are matched against the event's certificates (in priority order) and then the master; the first match wins. An attendee matching nothing gets no certificate.
So you migrate at your own pace: build a certificate for one event to move just that event onto the new system, or create a master to move your whole organization at once. Turning off the master's per-event opt-out (see the Master Certificate panel) lets a single event bow out.
Where certificates appear
Once an event is on the builder, its certificates are used everywhere certificates already surface in MemberLeap:
- Event emails. The event message editor's "Attendance certificate" attachment option attaches the attendee's certificate to the email.
- Batch export. The Reporting Dashboard's Print All Attendance Certificates export bundles every qualifying attendee's certificate into one ZIP.
- Member history. A member's event history shows a certificate icon for events where they earned one.
- Attendee Portal. If you enable the My Attendance Certificate tile in the Portal Builder, attendees can view and download their own certificate from the event's attendee portal.
Tips and patterns
- Start from a starter. The six built-in layouts cover most needs. Pick the closest and customize — faster than a blank canvas.
- Use a master for your standard design. If every event issues the same-looking certificate, build it once as a master. Individual events can still opt out or add their own event-specific certificate on top.
- Always include a catch-all. On an event with targeted certificates, add an Everyone certificate at the lowest priority so no attendee is left without one.
- Preview the PDF before an event. Click PDF in the editor to see a real rendered certificate with a sample attendee's data and confirm fonts, spacing, and the background image line up.
- Match credits to your labels. The Credits group only offers the credit types your event actually awards, labeled with your organization's own terminology — drag those on rather than typing credit values as static text, so each attendee's earned amount fills in automatically.