
QuickBooks Interface
The QuickBooks interfaces are written for Quickbooks Online (QBO) and QuickBooks Desktop (QBD) for Windows version 2016 and later. The two interfaces operate roughly the same, with exceptions noted below. It is designed to allow you to push transactions in the MMS over into QB so that they will match. This pushing of transactions (invoices and payments from the member billing and event registration modules) is done when you execute the sync operation, located at the top-right of member billing (once you've granted the MMS access to your QB account.
The primary difference between the two interfaces is that in the QBO interface, the data is pushed directly into QBO; and in the QBD interface, the data is pushed into a cloud environment (intuit anywhere), which can then be synced to your desktop using a 2nd sync operation within QBD.
NOTE: initially setting up the QB interface can be tricky, we recommend working with one of our staffers to guide you through the process one step at a time.
NOTE: keeping two systems in sync requires an ongoing commitment to verify that the two systems do not diverge. Although our interface contains tools to prevent this, there are no guarantees that you as a user do not create or change transactions in QB that the MMS is not/cannot be aware of, making the two system fall out of sync. Since the bulk of problems that occur arise from user error, we can not be responsible for providing forensic accounting services to help you determine the source of a problem.
In the event that the two systems get out of sync, if the source of the problem turns out to be a system error, we will correct it. However,
determining the source of the divergence (specific transaction) is YOUR responsibility.
Connecting
for QBO
In MMS configuration, under Quickbooks configuration, there is a link 'Click here to add/edit a connection'. Click on this and it will take you to a QBOE login screen where you can log-in with your user/pass info, and then follow a series of pages that will allow you to grant the MMS access to your QBO account.
The user who does this must have company administrator access rights.
When going through the process, be sure to grant access rights for All Accounting.
For login security, answer 'No, Anyone who can log in... can use the connection.'
Once completed, QBO will send the MMS a 'connection ticket' which allows the MMS to submit transactions to your account.
for QBD
You will first need to sync your company file to the Intuit Anywhere cloud. To do this use the Intuit Sync Manager. (Look for online services in the menu, then 'setup online services / sync manager'. From the intuit sync manager screen, login with your user/pass or click on 'new to Intuit app center - find out more' and go ahead and create a login. Then later log-in with your user/pass on the intuit sync manager screen.)
Once that is done, go to MMS Config, QB Desktop Config; then click on the Connect to QuickBooks button. You'll be asked a series of questions, and at the end... the MMS will have a connection to the cloud version of your company data.
Mapping Members
When starting out, if you have your members listed as customers in your quickbooks, it's important to link them to their corresponding Members in the MMS. We have a script that can accomplish most of this... but there may need to be some manual intervention on your part.
- From the Main Menu, click the "Membership Billing" link.
- Under the "QuickBooks Interface" subheading, click the "Member Status" link.
- Members who have been successfully mapped to QB customers will have "cust:###*QB" in the second column, while unmapped members will have "(none)*" in that column. For now, we'll focus on the members with "(none)*".
- Click on the "(none)*" link for a particular member.
- You will be taken to a screen where you can search your QB Company file for a customer. By default, the name in the search box will be "first last". Because your QB customers are stored as "last, first", you will need to edit this field. (I would recommend just deleting the first name and space, and searching on the last name.) Click the Submit button.
- You will see the name and contact info of the member in the MMS, followed by any QB customers the search found. If you see the QB customer that this member should be linked to, click the "Click to link this Customer" link under them.
- You may get a result of "NO FINDS!". In this case, the system was unable to find a QB customer corresponding to the name you searched on. You can press the back button on your browser to try a different search. If it is still unable to find a QB customer, you may want to double-check that the customer exists in QuickBooks. If they do not exist, then you do not need to do anything else; the MMS will add them as a QB customer the first time you sync transactions. If they do exist, please let me know who did not show up, and we'll investigate this further.
- You'll need to repeat steps 1-4 for all members who have "(none)*" in the second column.
- If you think that a member was mapped to the wrong QB customer, you can double-check it by doing the following:
- Click on the "cust:###*QB" link for that member in the second column.
- Enter the name you want to search for in the search box, and click the Submit button.
- If you want to change the QB customer, click the "Click to link this Customer" link for the correct customer.
Starting out 'In-Sync'
Before we can start pushing transactions over to QB, the two systems (the MMS as well as QB), need to be 'in-sync'. This means that the AR (Accounts Receivable) numbers on QBO must match that which is in the MMS, as of a particular date AND any transactions after that date are only in the MMS and not in QB. The idea is that by doing this, there is a starting point of agreement, such that we can easily detect out-of-sync conditions if necessary. The best report to use in the MMS is the aging report within member billing (view active and drop, members with +/- balances), then compare the number at the bottom to the numbers in AR in QB. Or better yet, compare to Member Balance Detail to see where the disagreement is.
Once you have reached an in-sync point, you will want to mark all transactions before the in-sync point as no-go (such that they will not be re-sent to QB, causing duplicates), and mark transactions after the in-sync point as 'go' (assuming they are not already reflected in QB). See the next section on how to do this...
Transactions - go or no-go?
You have the option of having some transactions to not be synced. This is useful if you have been using the MMS for a long time, and for many of the older transactions... you simply do not want pushed over into QBO, because they are already reflected there (via double entry of transactions, journal entry, etc.). Consult with us on how best to get your QBO started if this is the case.
To mark individual transactions as go/no-go, you can use the two Transaction Status reports at the top-right of member billing, under Quickbooks Interface; and then click on the links to the right of each transaction to toggle between export/do-not-export.
To mass-mark all transactions not yet synced as non-export (typically used when starting out with the QBO interface), look for the link at the top of MMS Config, then Quickbooks Config.
Mapping of Transactions
In addition, we also need to set up a few items such that transactions in the MMS can map 1-to-1 and field-by-field.
In order to map individual transactions in the MMS to QB GL (General Ledger) accounts and QB invoice items, We first map individual transactions to MMS GL accounts, and then in turn map those MMS GL Accounts to QB GL accounts and QB items.
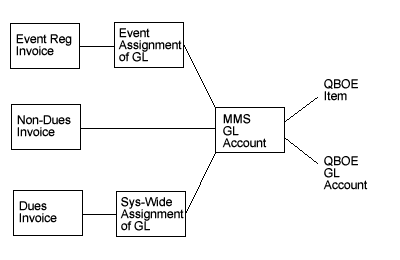
For the first part of this, the mapping of (invoice) transactions to MMS GL accounts works in 3 ways:
Membership Invoices (New Member and Dues) - GL accounts are assigned as a package, all new member invoices are assigned to a particular GL account, all renewal invoices are assigned to a particular GL account. This is done in Member Billing -> Edit General Ledger Accounts -> Select GL Accounts for Membership Invoices.
Non-Dues Invoices - GL accounts are assigned on an invoice-by-invoice basis, when they are entered.
Event Registration Invoices - GL accounts are assigned at the event level when the event is created/edited. There is a default GL account for event registrations, which can be set via MMS Config -> Quickbooks Config
For the second part of this, for any MMS GL account, it will need to be mapped to a gl account and an item (products/services) in QB. This can be done via Member Billing -> Edit General Ledger Accounts.
If an appropriate GL account or item is not available for selection, you will need to create it first in QB.
This diagram attempts to explain the linkage between transactions and QB items (listed as Products and Services in QB) and GL accounts:
We also have class codes that can be mapped to classes in QB, in an identical manner as the GL accounts (however, as of this writing, classes are only available in QB in the higher-tiered QB plans)
AR Accounts - transactions from the MMS can also be mapped to AR accounts in quickbooks. This can be done via MMS Config -> Quickbooks Config. This feature can be very useful in dealing with out-of-sync issues (see below).
Running the Sync Operation
The sync operation is where the transactions are actually sent ('pushed') to QB.
You'll want to do this on a regular basis. Probably weekly or monthly, however often you want to make sure things are synced up. The sync operation is located in the upper right of the billing menu, at the bottom of the Quickbooks functions.
The sync operation works in two stages (and two corresponding pages). You will run the sync, and scroll to the bottom looking for a 'continue' button- two times one for each state (page).
The first page deals with problems with transactions detected on the MMS side
The second page deals with problems with transactions detected on the QB side
If a problem is detected in either, the script will stop and give you an error, you will then need to make corrections to the data/system and try the sync operation again. This can be tedious the first few times if there are lots of errors, but over time, it will get easier.
Keeping In-Sync
Not every action in the MMS is automatically sent through to QB. Changes and voids to transactions in the MMS, need to be MANUALLY reflected in QB. NOTE: Once you are up and running using the QB interface, it is YOUR RESPONSIBILITY to periodically compare numbers between QB and the MMS to make sure the two systems are in sync .
Dealing with Out-of-Sync problems
There are several reports that are available that will help you track down the mismatched transactions in out-of-sync situations. Assuming that you have all transactions in the MMS over in QB and vice-versa (there are no transactions in QB that didn't originate in the MMS), this will make keeping things in sync easier.
If this is not the case, probably the best way to do this is to have MMS-based transactions all go into a particular AR Account. Then you'll be able to use reports to get totals on the QB side, exclusive to the MMS transactions. Which you can then match up to equivalent MMS reports.